Book Project
A master quilter who has published two books already sent
out an email to a select group of people - including me – to help test patterns
for her new book. She will be putting many
of the quilts the testers make into the book!!!
I can’t tell you who she is, or what the project is, or show
you what I made…..
It’s white, mauve/pinks, and greens. I designed a quilt based on her
technique. The design is my own except
for one piece that is based on her technique.
The layout is all mine. I quilted
it on my juki with some fun quilting, and I hand stitched the binding. The cats helped quite a bit <sarcasm>
and I have to put it through a dryer cycle to take off cat hair before I send
it in. It’s about 40 inches square.
That’s all I can say…..
Sorry….
I signed an NDA (Non-Disclosure Agreement). When she published, I can tell you more, and
show pictures.
I will have a LOT to say about the whole process and
pictures when she gives the “all clear”.
That might not be until spring, or even Summer….
However, I have to share my joy and excitement on this!!!!
Macro Photography
So, this started as my ONLY about quilting blog….
My other art forms quickly migrated in…
Here’s another: Photography!
I have a very nice DSL camera that I bought for myself as a
MBA graduation present. I didn’t buy top
of the line, or professional, but I bought a very nice heavy user camera –
Nikon D40. At the time that I got it,
Elinor and I were going to a lot of festivals and taking pictures of the athletes. I wanted something that could take good
action shots. I also bought the first
level of telephoto lenses for it.
However, I’ve always loved taking pictures of flowers and
plants. Since buying it, I’ve started to
experiment with macro photography and taking arty shots of pretty wildlife (and
some not so pretty!). You can see a vast
sampling of my attempts on my photobucket in this folder.
Filters
Recently, I bought a set of filters for the camera.
I have no idea what to do with them.
I’ve carried them with me on a couple trips and they remain
in their original packing.
I do this sort of thing a lot – I get very excited about something,
buy the equipment, read about it, and then get scared to use it (see a later
story here about wet saws). It then sits
for the longest time, and finally, I get the courage…..
And discover how easy it all was and feel like a fool!
So, to that end, Perry and I have plans to go to the Como Park
conservatory (it’s indoors), and just spend a day shooting.
Wish me luck!!!
Care and Maintenance
I take pretty good care of the camera. I have a nice, big case for it. I have a couple card readers that go into a
pocket, the charger goes into another (haven’t lost it yet!), and I even have a
spare battery for it (especially needed since I have a habit of leaving the
camera on). I actually keep them
charged.
But…. I lose lens caps….
A lot….
This time, I got smart, and I bought five (so I could have
backups)
However, I also bought the strings to attach them to the
camera.
So, now that I have four backup lens caps, I’m not going to
lose the one that’s attached for some time….
*sigh*
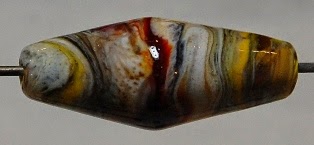
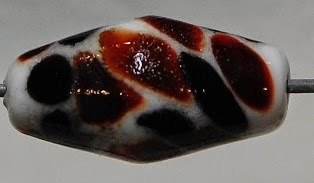
Glass
Beads
I am getting much better at making beads…. Really, I am, and
I believe it! I have faith in myself on
this one thing.
When I first started making beads, I somehow wound up
getting one of Malcom’s (the artist who owns the studio) beads in my returned
batch. It is a very nice, deep red,
bi-cone shaped bead. I know I should
return it to him some day, but it’s become a measure for me. It’s very well-shaped, large, and smooth.
When I first started making bi-cone shaped beads, they were
very irregular. They still have issues,
and I struggle with getting the shape right.
However, as I keep comparing my beads to his – I’m seeing less and less
of a gulf between them. I know I’ll
never be as good as him, but I think I’m developing my own style and I’m quite
proud of it!.
Here’s a bunch of pictures of just the latest beads.
 |  |
 |  |
 |  |
 |  |
 |  |
 |  |
 |  |
 |  |
 |  |
I Have a Problem…..
I bought a bunch of glass rods for making beads. I diligently watched Frantz Art Glass’s sales
and bought at the best sale – 50% off many brands/colors and free
shipping. I tried to buy a wide range of
colors and treated myself to a couple expensive colors, but didn’t go overboard
and kept to mostly value items.
It still was a lot of glass…. I’m certainly set for a while!
Here’s what my collection looks like now… I have enough to
make a LOT of beads….

Not that I don’t already have a lot of beads…..
Here’s what it looked like when I organized JUST the beads
that I’ve made…. We won’t discuss how many other bins I have of beads….

Search for Pink
Despite the volume of that purchase…. I want a certain color…..
I can’t really name it….
Much less find it!
Sort of a dusty, deep mauve pink. I want the pink version of this purple color. Not solid, but more
streaky like it.
Pink/reds are the MOST expensive colors in glass. So I can’t just buy a whole bunch of things
and try.
I found three at Frantz that may be what I want – two good possibilities,
one not so much but would be a cool color to have. But, let me explain the pricing. If I buy ONE rod, of standard colors, it’s
about $1 or a little less. If I buy by
the quarter pound, I usually get 5-6 rods for $3-$5. The one pink color that I think is what I
want is $5 per ounce. They are special –
hand pulled – so inconsistent is size.
Most rods of that color are 1.5 – 2.5 ounces. This is the rod.
Possibly this one, which is closer to $4 for a standard rod:
And this is the third color.
It’s $5 for a quarter pound.
Reasonable, and I think I’ll get to have.
Fusing
I’m going to fire up my kiln and get back to doing some
fusing. I think this is going to fall
into the same routine of me buying cool tools and then being afraid to use
them. Finally, I use them and realize
how simple it was!
The Pink Color
Today, Perry and I went to JRing Glass. I was actually trying to find a pink fusing
glass color that I could cut into strips and try to make beads of. I may actually try that with some glass I already
have – a hand rolled mauve/pink/white mottled glass. As long as I use only that glass (its 90 COE)
and don’t add dots, or decorations with the 104 COE, I should be fine. My only fear is that it will act a little
differently in the annealing kiln.
But, nothing ventured, nothing gained, right?
I found a couple colors of glass that I wanted to play
with. One was the pink that I’m looking
for, and the other is a beautiful purple.
However, they are both “striking” colors. The sheets are translucent and NOT the color
that they wind up after they come out of the kiln.
That scares me a little.
Will they strike to the same color if I use them on the
torch and then anneal them in the different temperature kiln?
Hmmmmm
Normally, I would buy some of each – the color I wanted for
beads and the color that I love…..
But, this glass is EXPENSIVE
A 24 x 24 sheet of clear fusing glass is about $20-25,
depending on thickness and clarity/pattern.
A 12 x 12 sheet of single color, simple fusing glass is $7-12, and going
up from there for specialty colors.
This glass is special size.
A 10 x 17 sheet of it is $50. Some
of the striking glasses had small pieces – 8 x 10 – that were priced at $25 or
so, but the pink and the purple that I looked at didn’t come in those
sizes. I just couldn’t
So, the decision I made was to get the purple and try a
strip or two on the torch to see if it works.
Then, I will use the rest to make myself a special fused piece since purple
is MY color. If it does work, then I may
go back and get the pink and try that out too.
In other words – nothing lost!
Tea Light Mold
When I looked at the JRing website prior to going to the
store, I noticed that they had some small draping molds on a special sale. When we got there today, they had a display
setup with them and showed a bunch of tea light holders made with them and just
a single layer of glass. Note: you can “fuse” scrap/stained glass glass if
you use ONLY that glass (can’t mix COEs).
That means I could use a lot of really cool glass (that’s also pretty
cheap) and make some neat Christmas gifts.
Perry tried to talk me into buying four of the molds so I
could make more at a time in the kiln. I
settled and bought two of them. I think
that they will be my test of the kiln.
Rocks
I’ve been picking up a lot of rocks as I’ve been going to
places that have some neat ones. My plan
has been to polish them. A secondary
plan has been to take that flat of red calcite that I bought in Tucson last February,
cut it, and polish up the slices. Back
to the “Mary buys tools and then is afraid to use them discussion….” I bought a wet saw at harbor freight with
that sole purpose in mind.
I bought it last winter….
The box has sat unopened in the basement….
After the last round of picking up cool rocks, I went and
bought a rock tumbler.
(Did you know that it takes one week per stage to tumble
rocks and that there are FOUR stages!?)
So, I bit the bullet today.
Went to the basement and dragged up the box with the wet saw.
I didn’t realize however, that the box said “blade not
included”….
A bad word was said…..
I went back to the basement and got the other wet saw. (When I bought out that woman’s glass fusing
setup (how I got the kiln), I also got all her tools, including a well-used wet
saw that she used for cutting glass pattern bars.
At one point, Chris called home:
“What are you doing” Said Chris, in a friendly, enquiring
tone.
“I’m sitting on the kitchen floor surrounded by wet saws”
To my husband’s credit, he didn’t ask anything else, nor
find that particularly unusual in the great scope of things that Mary does…..
Wet saw #2 (#1? Since it’s older), got dragged outside, I
found my safety glass, grabbed a bunch of the calcite, and a spray bottle of
water – the large, Home Depot sized bottle.
Lesson #1 learned:
Calcite crumbles when cut.
Oh well…..
Plan B: what rocks
have I collected and put by the small pond in the yard?
Answer: some really
neat ones that showed fantastic patterns when cut.
Lesson #2 learned: go
slowly whist cutting. Even harder, solid
rock will break off.
Lesson #3 learned:
wear the heavy duty work apron that Perry got me next time.
Current status: The
rock tumbler is 2/3 full of rocks (per guidelines) and is on the floor under
the sideboard in the dining room where it will be for the next four weeks,
rolling away……
Pictures will eventually be posted.
No comments:
Post a Comment