Sunday, August 26, 2012

Empty Nest Syndrome

I used to do a lot more sewing… a lot more projects of all sorts actually… even when there were still children at home…. 

Something happened when hubby and I became empty nesters – I developed a much more encompassing social life!

I’m a little embarrassed to say that I’m way behind on my projects again due to going out…. J

However, this week, I have spent time on hobbies and with Labor Day weekend coming up, I intend to do more.

Last year, when hubby, daughter and I did our annual pilgrimage with my employer to a resort up north, I took along my Sylvia’s sampler bag and prepped a couple dozen blocks which I later assembled in our group time.  This year, instead of being good and spending down time at the resort doing that, I spent an extra hour in the Spa, indulged in drinks, bought a car, talked with the group more (even got called “fun”!)….

(Embarrassed face…)

Ok, not really – I had fun! 

And it’s ok that I have no Sylvia’s blocks prepped for the next group day; I may be going to Chicago to participate in a giant game of tag – the Robot Apocalypse event….

Yeah, I’m reverting to a teenager…

Glass:

The Pendant from “The Glass”

Last blog post, I talked about a special piece of glass I bought and showed you pictures of what I made with the glass.  One of those was this necklace:


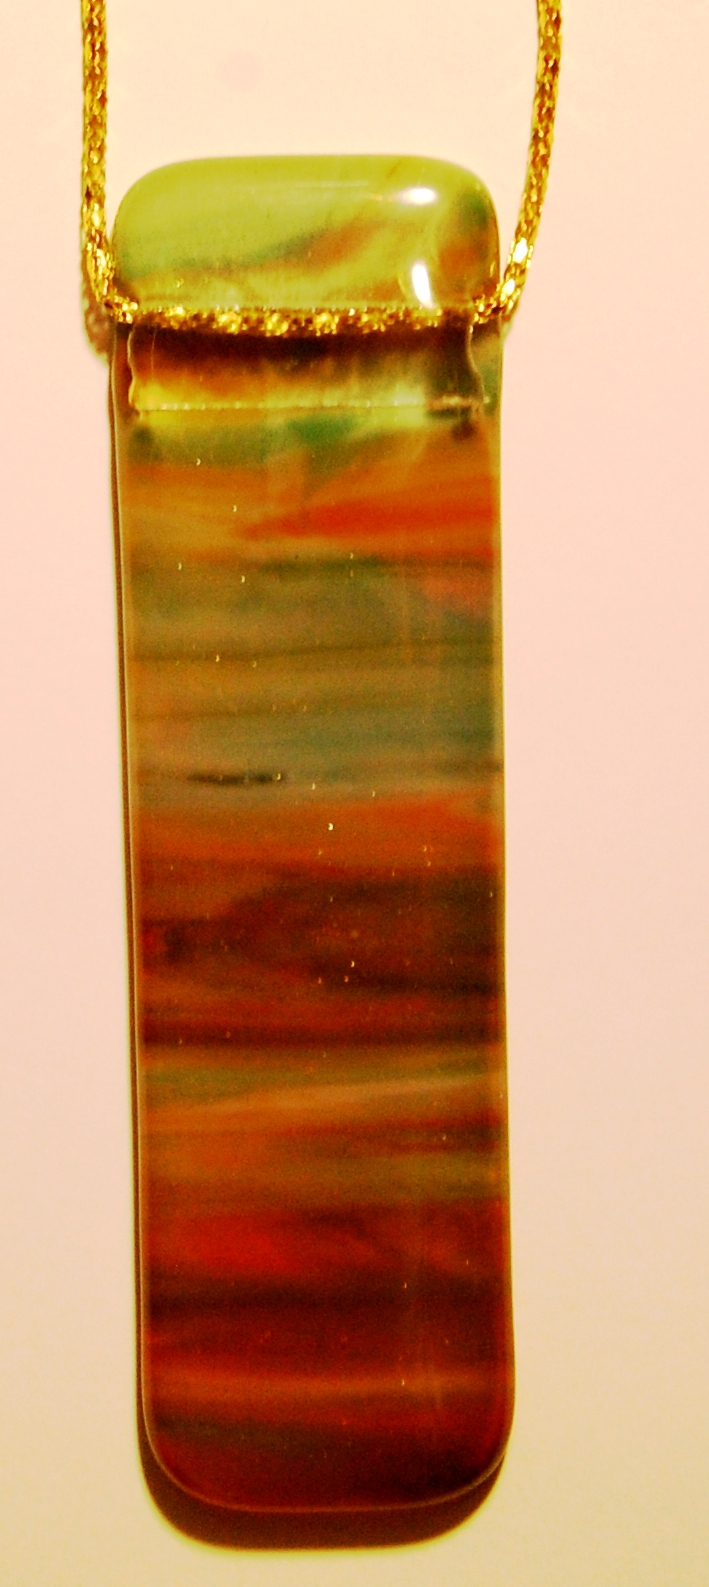
It’s really quite simple – It’s a 5 x 1 inch piece of the glass, covered by a clear piece, and has a channel for the chain (the channel is created by inserting a piece of fiberglass paper between the layers of glass.  Firing in the kiln creates a gap). 

I have been getting a TON of compliments on this piece.  On Friday, I wore it….
·         I went to the cafeteria at work for a tea.  The girl working the register went on and on about it.  I’m putting a couple more – different sizes – into the kiln this week and she’s getting one.
·         After work, I went to the Studio at Rush Creek.  Irene – one of my mentors – commented on it.  This woman also works in glass!
·         After the studio, I went out.  A guy I was talking to – friend of a friend – reached over, and lifted it from my next to look at.
·         Same night, the female bartender also made comments on it.  I told her that if I was ever back there – I’d bring her one!

In Progress

Since I’m on the subject of glass…

I like taking pictures of my in progress work.

One of these days, I’ll actually bring my good camera, take several shots along the way, and put together a nicely written piece, with a photo montage taking people through my creative process…..

Here’s picture of what I have going right now:


·         Left:  a nine inch square that has been covered with diagonal strips of various blue glasses.  I got this idea from seeing a piece someone else was doing at a studio.  I’m not copying him verbatim – don’t worry – this is more “influenced by”
·         Middle:  seven pendants from “the glass” in varying sizes.  The white bits sticking out from one end are pieces of fiber paper.  This will create a channel – gap in the glass – during firing that can be used for the chain rather than having to glue on a bail.
·         Right:  another attempt at floating mosaic cut pieces on a bed of powdered glass.  I tried this with the special glass (see last blog post), but I didn’t use enough glass and it’s really hard to see it in that piece. Hopefully this piece will be better. 

I’ll post pictures of the completed pieces in the next post.

Pricing

I’ve been asked to put a piece on consignment at the Studio.  I also have someone at work who is very interested in a larger piece of mine.  This is the piece he likes:


This is actually my FIRST large piece in what I call “my style”.  (See previous blog posts in which I talk about that style)...

I told a friend that someone wanted it and explained my fixation on not wanting to give up any of my art.  He asked me if I had a place for it at home.  I told him that, honestly, it didn’t fit my house and that there was no way I could display it due to cats.  He told me that I should take good pictures, sell it and use the money to buy more glass!

Which brings me to:  what do I price it at?  Nobody wants to pay artist prices for a quilt.  I’ve discussed that before – but glass is more mainstream art with a better market.  I asked one of my mentors in the glass art world. 

She said “$250.00”. 

Bold and blunt like that.

I don’t know… I’m scared.

Comments?

Fabric

Kanzashi Flowers

My wonderful friend Cathy taught a class at our quilt group today on the Japanese folder fabric flower technique called Kanzashi.  We made three different flowers.

Cathy is very organized with this.  She had tool kits put together for us, sample fabrics, etc., etc.  Only person I know who owns more glue guns than I do!!

I only took pictures of the flowers that I’m proud of… J

These are done in a celery green dupioni silk.   The largest is about 3 ½ inches and the smallest about 2 ½ inches.


Jo’s Little Women Group

My participation in the group is suffering greatly…. It’s this danged good social life!

I haven’t done the last two months quilts and class is next Tuesday. 

I got one block (of nine, plus sashing and bordering) done today. 


The quilt – as I mentioned – is nine of these blocks.  The block is 5 ½ inches.  I forgot to look at finished size of quilt, but I’d say about 22 to 25 square given that block size.  Its name is Raspberry Swirl.  The suggested fabric choice is reds for the color and then beige/tan neutrals.  I’m doing mine in two different pinks (didn’t have enough of this one) and will alternate the blocks.  This pink is more hot pink with a slight pattern.  The other pink is a dusty rose color, also with a small pattern.

There are many little pieces in this block.  I’m quite proud to say that I did very little ripping, and managed to precision piece it to the right size!


Sunday, August 12, 2012

Mostly Glass....

Pictures and More Pictures

I’ve been spending way too much time at glass work compared to quilting and I have to re-focus and catch up on projects.  Glass will always be secondary to quilting, but I’m currently fascinated with it!  Give me a couple more months of glass fascination, and I’ll be back to quilting more. 

However, I can attest – honestly – to the fact that I HAVE kept up with my block of the month projects.  In fact, tomorrow is both the TCQ Block of the Month and the Glacier Star at Glad’s.  I’ve done my block for TCQ, and I’m doing two Glacier Stars – both of which I’ve completed the work so far for!!!

TCQ Block of the Month

While I’m on that subject…. Here’s a picture of my current block. 


Each month, we are given a block and some fabrics.  There is also an expectation that we’ll buy other fabrics.  This year – just as I did last year – I’m not exactly following the monthly fabrics, but making mine totally scrappy.  I also didn’t buy the finishing kit, which includes a striped fabric that everyone gets and is essential to the pattern (stripe that is).  I picked out another stripe. 

I’m such a rebel…. J

Daughter and Quilts

A quick, cute story about my quilts….

Elinor, my younger daughter moved back to Minnesota suddenly.  They arrived late in the evening.  We set them up with a blowup mattress at a friend’s house.   Apparently the friend didn’t have too many blankets, so the next day, when there was more time, she came to my house and raided my closet.

She grabbed three quilts pretty quickly, while stating that she’d missed them! 

I don’t think I’m getting the quilts back anytime soon….

Glass

I’ve spent about 12 or so hours at the studio over the last couple weeks.  I stored a few partial projects there as Karen (studio owner) didn’t have kiln space.  Last Sunday, she had two empty kilns and I filled them both!  I finally got back there today to pick up.  She greeted me by saying that I have some masterpieces to pick up!

Oh, that reminds me, last Sunday when I was there, Karen asked me to put a piece on consignment!!  I haven’t decided which yet….

I’ve got a bunch of pictures to show.  Bear with me, these are not great pictures.  I’ll retake them sometime soon, outside, in good light.  I was just anxious to get them out there, so they are taken with my good camera, but in my poorly lit, yellowy living room, one my flannel board, which is also currently covered in cat hair and needs a good cleaning!

THE piece of glass…..
Ana is going to hate me for telling this story….

We went to the glass store, and I treated myself to a 20 x 20, VERY expensive piece of glass.  My goal was to make another leaf bowl from it.  I had the piece wrapped and laid it flat in my trunk.  Ana and I then went about a day of shopping.

Our very last stop (something like 8 hours later…), was Wal-Mart and she got a container of kitty litter.  She placed it on something in the truck, and about 1 mile down the road, we heard a thump….

Yes, sure enough, the kitty litter toppled over, and cracked the glass down the middle….

She felt awful…

I assured her that A:  there was a big enough piece to cut the leaf, and that B:  I FUSE glass in a kiln, There’s a point at which cracks and breaks don’t matter!

A few days later, I took the piece to the studio and began working with it.  The initial break didn’t matter after very long…. The piece is what is referred to as “hand rolled” and just was a biyotch to work with.  The actual leaf cutout broke into three pieces just cutting it out!  You cannot tell looking at it; it fused together nicely.

The Leaf Bowl

Take a look at the bottom/outside of the bowl first.  This is what the glass looked like unadulterated; greens, oranges, whites, in a wavy pattern.

Now look at the inside of the bowl.  I put an orange/yellow transparent piece of glass on it rather than a clear piece.  I’ll be honest, this glass is 90 COE and I forgot to buy more 90 COE clear.  I looked through my stash and I had the yellow/orange transparent. 

Despite the accidental nature of the result, I am immensely pleased!


The Large Mosaic Plate

So, after cutting the leaf and learning just how much that glass broke up, I started looking around for what to do with the pieces… Karen had a piece that someone else made that had a border and then “mosaic” like pieces in the center.  I decided to emulate it.


I planned for a white frame, but I got the wrong glass, so went with the green that I had in my glass stash…

Yes, I now have a glass stash in addition to Fabric stash!

I also laid the mosaic pieces on a bed of powdered glass.  I’m a little disappointed that it didn’t come through better.  I’ll use more next time.  One of my mentors, Irene, keeps telling me not to be stingy with the powder, but I still am….

Appetizer Dish

By this time, the glass was getting pretty used.  However, I still had one decent sized piece left, so I went looking through Karen’s molds.  I found one for an approximately 4 x 10 candy/appetizer/whatever dish with three compartments.

Luckily, the glass cut well. 

This piece is only that special glass and a layer of clear.  Nothing else.

Wind Chimes

I used a couple other scraps of the glass in some more pieces I will show here, but these three pieces use ONLY clear and scraps from “the glass”.

I also bought special wire from the glass shop that can be used in the kiln.  These three pieces – about 1.5 x 4 – will be used in conjunction with some beads (maybe ones I made with the torch) to create some wind chimes.  I’ve seen wind chimes made with fused glass before; I think that the 2+ layers and the kiln process makes the glass strong enough for this purpose.  


Necklace/Pendant

I make a lot of pendant bits.  I’m showing the one special because of two things.  First, it’s a simple cut from the special glass, with clear over the top, and NOTHING else.  Glass can be just beautiful on its own without anything else done to it!


Second, let me explain why you can see the gold chain running through it.  When I laid the clear piece on top of the special glass, I placed a ¼ inch wide piece of “fiber paper” between them.  This thick, fiber glass paper holds up to the kiln and a channel is created.  I have not done this much with pendants, and I’ve had a couple of spectacular failures, but this time it did turn out very nicely.

I wore this pendant/necklace today combined with another jewelry piece that I made.  Recently I bought a necklace from my favorite eBay seller, that when hung singly around my neck, reaches to below belt.  Needless to say, I double it over when I wear it!  I bought three packs of colorful beads from my local Joann’s, combined them with some simple gold colored spacer beads, and copied this style.


My Style

I seemed to have developed a specific style of piecing glass to create “quilt like” pieces.  This is what I do:
·         Cut different glasses in a color family/related color families to fill in a specific sized base piece (usually either white or clear)
·         Fill in small gaps with stringers or noodles of glass (narrow tubes, or fettuccini like pieces)
·         (sometimes) fill in some sections with glass frit (chips)
·         Cut millefiori slices and/or glass rod slices and lay them on top
·         Melt stringers of glass into twisted shapes and lay on the top

Blue Piece

This piece is 8 inches by 24 inches – another of my grandiose ones!  It has many things going on:  Frit, marbles, millefiori, textured glass (that stayed pretty textured!), and melted stringers.  See below for a pre-fired kiln picture.


And here are some small pieces that I made from scraps of it... too big for pendants, not sure what their use will be.


Green Piece

This piece is 4 inches by 20 inches.  Pay attention to the pink piece towards the right, center.  I have no idea why it is pink!  Glass can change in the kiln.  I didn’t put pink into this!  Really, I didn’t.  I have to look at my glass carefully and figure out which piece is doing this effect.

Wind Chimes

Another set of pieces for wind chimes – a larger set this time – and another occurrence of the mystery pink.  I do like the effect though!

Here is a pre-firing kiln picture of the blue piece and a couple of the wind chime pieces.  Notice the piece with several triangles on it?  One of those is now pink, but in here it’s clear!


Vases

I’ve recently discovered cutting glass into circles and draping them into vases.  This was another class that I took at the Studio at Rush Creek.  I also learned that glass can be draped over anything that is stainless steel.

Both of these vases were supposed to be circles draped evenly.  Something happened, and they came out very asymmetrical.  I absolutely love the effect!

Record Vase

I’m calling it this because it looked like a record when cut and laid it out prior to fusing!  In retrospect, the marble in the center was a bad idea.  It didn’t fuse flat, and the vase doesn’t sit flat.

Top view, side view and pre-firing view.


Green Shapes Vase

The technique used for this vase is to cut squares in different sizes and lay them on top of each other.  I don’t know if it has an official name.  In the kiln, the squares round out a little on the edges and it’s a cool effect.  I also cut circles from some glass rods and laid them on top of two or three layers of squares.


Again, the asymmetrical shape is pretty cool.

Small Pieces

I would be rambling and repeating if I were to right about every single jewelry/small piece that I’m going to show.  I’ll try to group them a bit.

Crackle Pieces

These are a couple of larger “small” pieces.  They are made from some scraps of crackle (using powders) that failed in the kiln a few weeks back.  Recycle everything!


Various

·         Grey/purple/black with millefiori and some dichroic glass
·         Blues using some sparkly glass
·         Matching pieces to use for earrings; each piece has a scrap of dichroic in the center
·         Orange square piece
·         Red/orange/black piece – stripes with pieces of dichroic in each stripe
·         Orange/yellow piece, includes some yellow fritt in one corner
·         A red and black piece – has a channel made with fiber paper. 


Millefiori Pieces

Each of these pieces was made by laying millefiori pieces on top of clear glass.  The millefiori is 104 COE (Coefficient of Expansion), but the clear glass is either 90 or 96 COE.  Combining COEs can cause cracking.  I like to push the envelope…. I often include slices of millefiori as decorations on pieces.

However, I’ve come to the conclusion that I need to buy some COE 104 clear glass.  I like the effect of the millefiori, but look closely at the pictures – there is some cracking.  COE 104 is just so soft and it doesn’t work well when it’s a more of a layer against the clear than just single pieces.

·         Black and white millefiori on clear.  These pieces are going to be used for a necklace
·         Backside of the above, notice the cracks?
·         Blue and white millefiori on clear
·         Back side… I like this effect MUCH better, but it’s cracked.
·         Light purple on clear (black centers) for a pendant and earrings
·         A yellow/gold piece and a green piece.  Both very cool millefiori
·         The backsides of above.  No actual cracks, but some odd puckering