Today’s posting is going to be a photo gallery of what I’ve been working on lately.
Quilt Pictures
I’ve completed a few larger quilts lately, but I have yet to take pictures of them. My rule to myself is that I don’t photograph the piece until it’s quilted and bound. The main reason for this is that I trim all the threads as I quilt it!
Most of the pictures presented here will be small quilts made with scrap pieces from those larger quilts and other small pieces; I need to set a day or two, clear the table and get those bigger pieces quilted!
Helpers:
First up – two of my cats. Bronx is in the front and Ariel is in the back. ALL my kitties love to help me quilt… They can frequently be found: holding down piles of fabric, guarding fabric stash on shelves, testing the strength of whole spools of thread, examining the ironing board, randomizing pieces (even when it’s NOT a scrappy quilt) and performing many other “helpful” chores for me.

Embroidered circles:
Several years ago, I used up a bunch of little bits of thread that I didn’t want to waste. I used it by embroidering the same embroidery design over and over. Those squares have been sitting is stash for a while and I decided to use them up. A few months back, I used a couple color ways and now, within the last few months, I used the other color ways in several pieces.
I tried to go scrappy and use up fabrics from my scrap bin where ever possible.
Purple: This piece uses many small strips from the scrap bin and a small piece of purple yardage.

Blue: The same is true of this piece; used up some strips from the scrap bin and a smaller piece of yardage.
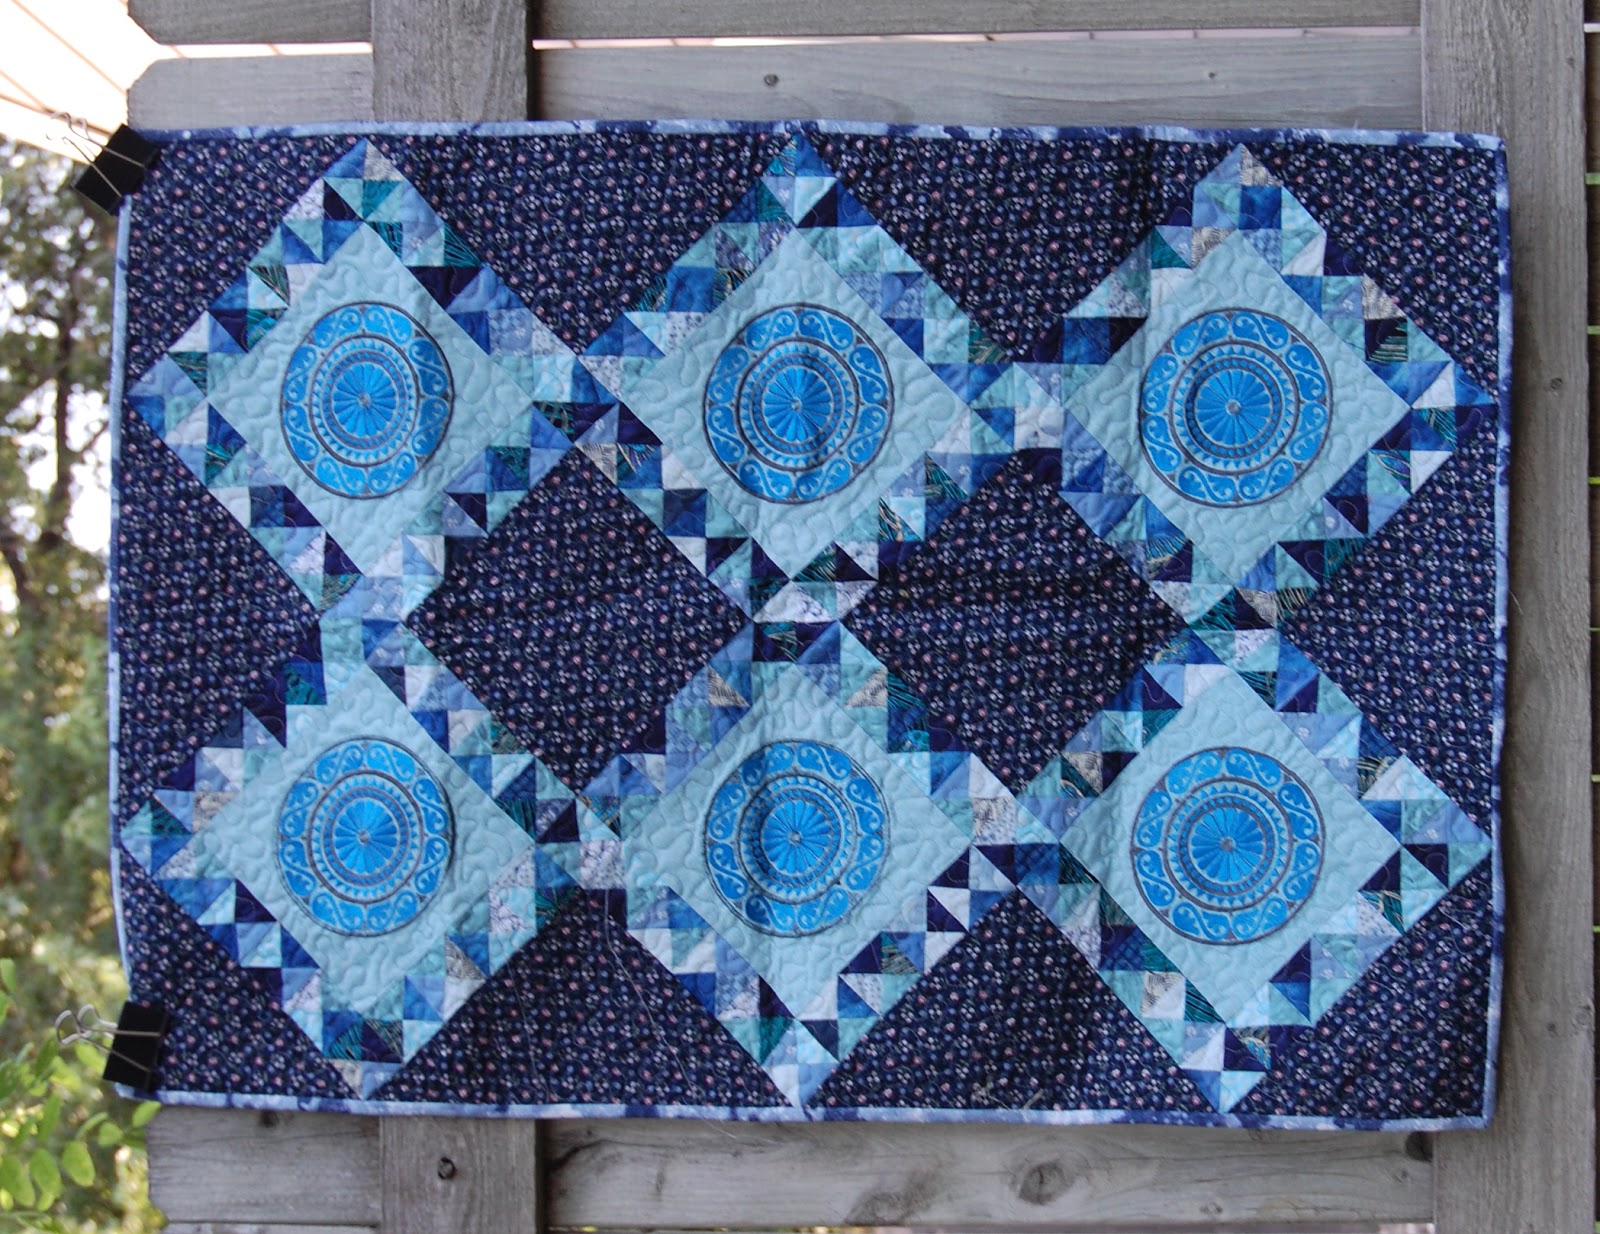
Grey: This piece differs from the others. I used yardage only – not scraps – and there while the designs are all the same pattern, there are two with one set of colors and two with another set. The commonality is that each has grey.

Circle Dance:
Several months ago, I posted a picture of my Circle Dance quilt. That king sized piece was made with two different sizes of circles and used only fabrics from the “Stonehenge” line. That quilt was constructed from 24 fat quarters. I cut circle templates – first the large (7 inch) and then the small (3 ½ inch) out of those fat quarters. The number of template pieces that I was able to cut determined the size and makeup of the quilt. The following two pieces were made with my leftovers.
Large Pieces: I had exactly six larger blocks left over. After trying them a dozen different ways, I came up with this configuration.

Smaller Pieces: The smaller leftovers played double duty. About the time that I was staring at them, I also had a monthly pattern from the Scrap Tamers program that called for a drunkard’s path block at the center. Well, those Circle Dance blocks are basically the same!
Following the instructions for the Scrap Tamers’ pattern, I substituted in the leftovers and made two of the basic blocks. I then added a border and called it a small table topper. For level setting, the Circle Dance blocks – two pieces, a quarter circle and the piece to make it square – in the picture measure to 3 ½ inches finished.

Jo’s Little Women
One of my monthly groups is the Jo’s Little Women group at Glad Creations. The patterns are designed by Jo Morton and members must purchase a number of her fabrics (I think it was 24 Fat Quarters) in order to participate. You may use other fabrics in the monthly projects as desired.
Month 2: This piece is the Month 2 quilt. It is a VERY SMALL piece. Each of those Flying Geese is less than an inch tall. The original pattern has scrappy Flying Geese; I chose to first use the four-at-a-time method and also chose to make a color progression…. Just my little twist to change the pattern and make it my own!!

Month 2 Scraps: True to form…. Here is what I did with the leftover Flying Geese (since I used the four-at-a-time method, I wound up with extras)

Month 1 & 2 Extra Project: The teacher in the class publishes her own patterns. I cannot show you the extra project because the pattern is in the publishing cycle. I can only show you the table topper I put together with the leftoverpieces.

Mariner’s Compasses
I’m breaking my own rules here… I just had to!
This is NOT a finished quilt; it is only the top…..
I took a Mariner’s Compass class at a local shop. If I remember correctly, that compass is the one directly above the one in the bottom right.
I then used my Carol Doak Foundation Factory CD for Mariner’s compasses to print out patterns for a slew of Compasses in different sizes.
My Daughter-of-the-Heart, Brandie, was helping me hang the quilts for pictures that day. I could have cropped her out of this, but I just think it’s a cute picture of her!

Leftovers: I thought I planned out things well, but somewhere along the line in printing up patterns from the CD, I lost track…. I wound up with extra….
So, they got put into a runner…..

String Pieceing
I love string piecing! You can create such fun pieces and it’s a great way to use up a LOT Of scraps.

Challenge Piece
I wrote a blog post about my groups challenge… actually, it was mentioned in several. Quick recap: two colors chosen blindly (I got blue and orange) and you could use yellow – any shade – with them.
I chose to make a Marnier’s compass. Yes, I used the Carol Doak software again. There is my trademark chaos and order mixed together in this piece too.
· The Mariner’s compass is very ordered and precise
· The circles are hand appliquéd and both randomly sized and placed
· There’s straight line quilting coming off the compass and running to the corners and sides.
· There’s meandering quilting in between many of the compass points.

Since it was a “challenge”, I decided to further challenge myself and make the piece in both fabric and glass. I created three versions of the design in glass. There are each a different size and while I used the same blue and orange glass in each, I varied the background (yellow).
I displayed Number 2 with the quilt at the Challenge Reveal.


Glass Pictures
And with that last entry, we have moved to glass.
I am not going to annotate the glass pictures at the same level that I did the quilt pictures.
There just isn’t the same amount of process involved….
Rather, I’m going to group some of the pictures and just use their names/descriptions.
Simple Plates/Dishes
These are mostly test pieces and/or learning pieces. These aren’t things I consider anything great (although many may wind up as gifts J )
· Blue Bowl

· Checkerboard tile (should have been better, but one of the black pieces was put on face down (has a shiny side))

· “Concrete” Bowl

· Green and Purple Plate #1

· Green and Purple Plate #2

· Green and Purple Bowl

· Lime Green Bowl

· Orange Bowl

· Orange Plate

· Black/White/Red Plate

· Purple Sifted Plate

Tack Fused Pieces
Tack fusing is when things are only melted long enough – and lower temperature – in order to round the edges of the glass rather than having everything fuse completely together and smoothly
· Blue Plate

· Green Plate

Specialty Cutting
These pieces required curved cutting to fit into special molds to give them their unique shapes. In both bases, simple sheets of glass were used rather and combining a lot of pieces.
· Red Snack Tray

· Green Leaf Bowl (note: the glass used for the main piece came with all the little bits in it. The green spine of the leaf is a cut piece of plain green). I’ve also included two views of it to illustrate the whole shape.


Specialty Plates
Each of these plates was designed by me and incorporates different methods
· Red Brick Sushi plate – This one came to me in the middle of the night. It’s hard to see in this picture, but it has twisted white stringers of glass on top to represent graffiti.

· Crackle Plates – These plates are made with sprinkled powdered glass.
o The green plate is a white bottom, green powders and then clear top.
o The purple plate is a clear bottom, purple and brown glass powders, clear glass and then some purple strips of glass and black noodles of glass.

· Purple/White/Clear Plate – This plate was NOT made with whole sheets of clear, rather, the clear and purple were cut and pieced together to create a single layer. This kept the purple in largely square shapes rather than rounding them. The white on top of the purple was laid on top and thus the edges rounded slightly. Lastly, there are circles cut from a purple rod on top of the white.

· Red Plate: This plate is made of a beautiful and expensive red glass. The black is cut and placed between pieces of red. Also, there are small pieces of dichrotic gold glass in between pieces of black.

My Unique Style
Somewhere along the way, I designed a “style” of my own and started creating in it. You can see the quilting elements in there.
· The basics – geometric bits pieced together and squared off

· Embellishments incorporated (twisted stringers and millifiore bits)

· The first larger piece (12 inches)

· And, the current state – display pieces. Each is 8 inches x 2 feet


No comments:
Post a Comment