Chocolate Covered Cherries
The headliner for today’s blog post is my daughter Ana.
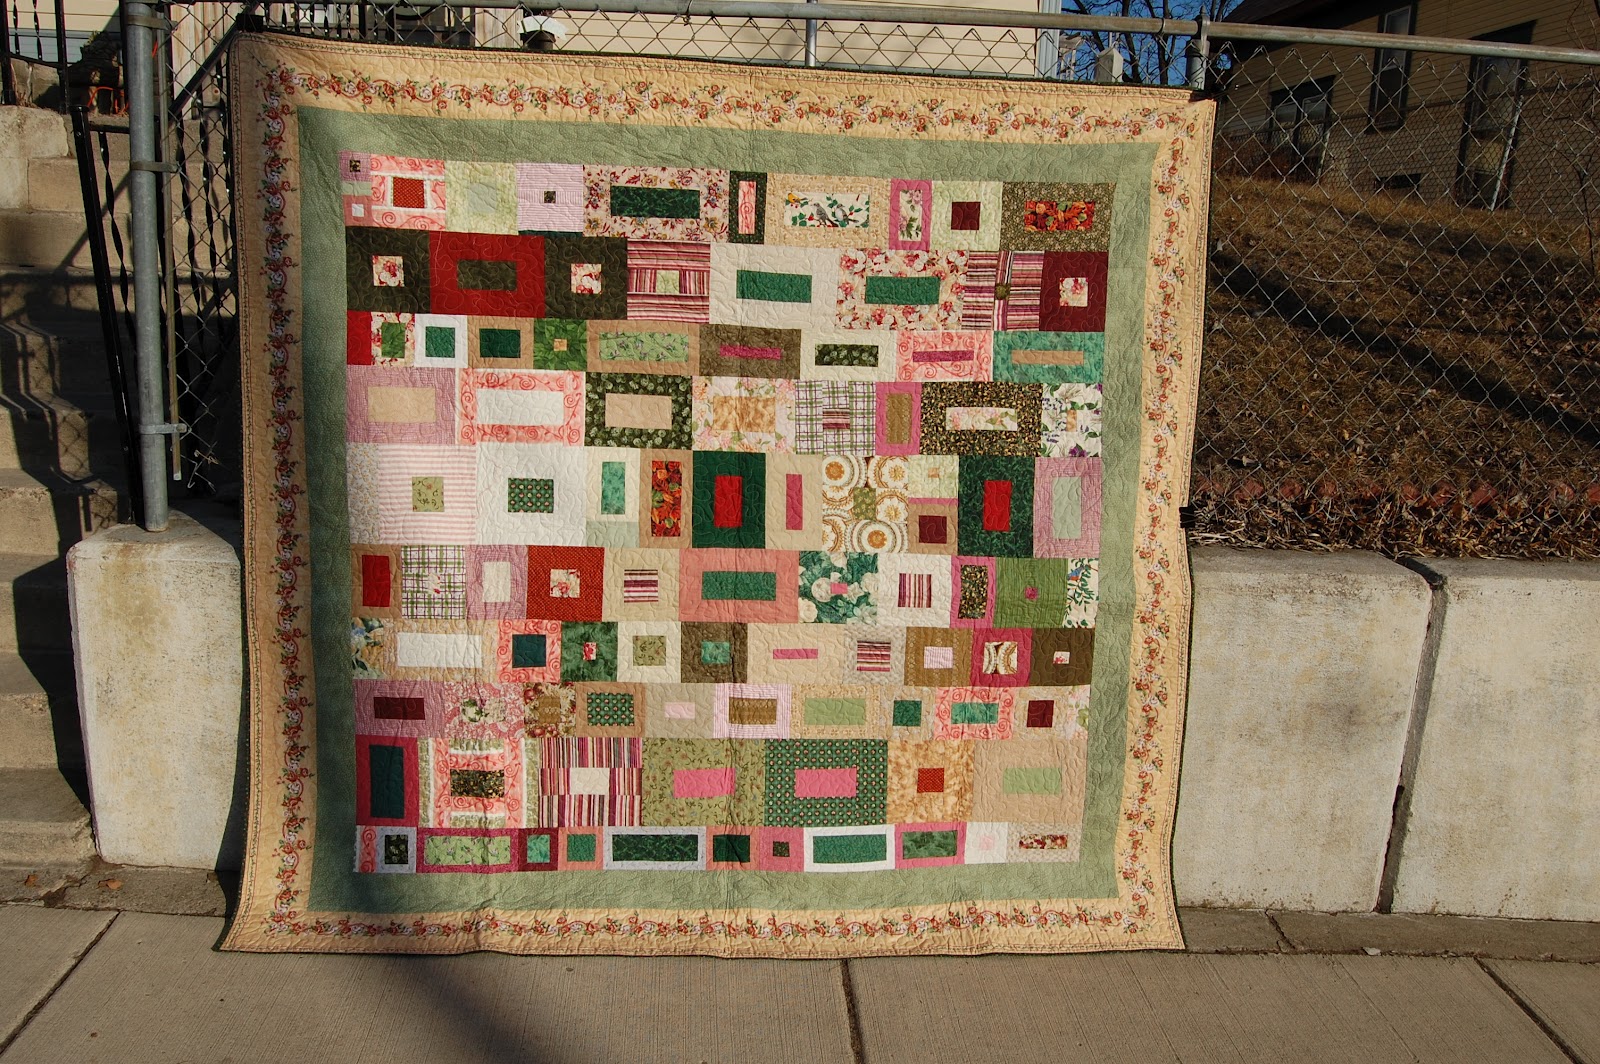
Several years ago, I bought Ana a pattern called “Chocolate Covered Cherries” at a Sewing expo. She dutifully raided my fabric stash and has worked on the quilt on and off ever since. It really hasn’t taken her the whole time; she’s completed other projects in between.
She is now FINISHED with the quilt and it looks gorgeous. I will admit to having a certain amount of jealousy and a desire to do the pattern myself.
The quilt is a large queen size. 103 x 85 or something near that.
She laid it out and pinned the sandwich all by herself….
*sniff*
My baby girl is a real quilter now! (I helped her with all other layouts).
And, then she says to me: “when are you going to be able to get it quilted?”
Four years she pieces here and there on it? Spends time at three different mini retreats putting the borders on…. Taking her time…. But now it’s RUSH Mom, get it done!!!??
Yea, I’m going to make it a priority…. I’ll bitch, but I will, and she knows it….
Got My Mojo Back
Last week, I griped and moaned about nothing going well….
I now have my quilting mojo back.
This weekend was a “mini” retreat for my group. We get together for all meals and lots of sewing starting at 4 PM Friday running through 9 PM Saturday. The only difference to a full retreat is that we stay in town and go home to our own beds.
I brought the project box – the one that I’m trying to eliminate – and only worked from it.
Contest Entry (one)
First, I finished up the ill fated contest entry. It is absolutely gorgeous and I actually really like it (I never like anything that I finish, when I finish it. Most often I do like it later).
If you remember from the picture last week, the corners on the quilt need a filler fabric to bring the quilt to a square. I went to the retreat on Friday unsure what I wanted to do. The original plan was for white, but once the quilt was done, the corners seemed to cry out for something else.
I laid the quilt on the floor and laid a different fabric under each corner of the quilt. All the group members present came over, critiqued the choices and gave an opinion. It was NOT unanimous; there were several schools of thought, but enough people agreed with my first choice so I went with it.
That top is now finished. I haven’t taken any pictures yet. There’s a lot of black on it and I have five cats. I’m going to put it though the dryer before I try to take a picture.
Scrap Tamers
Next on the catch up list was the other “problem” in my project list – the double cutting of the pieces for the Scrap Tamers mystery. I’ve posted about this as well.
I only cut double of the main fabrics – I did NOT cut double the background. This gave me an excellent opportunity to play with color and different styles. My main fabrics – the scraps – are all black and red. The background for the first set is a black print/design on a winter white background. It gives a very base, mellow look to the project. I originally thought that I was going to go with a bright pink for the duplicate pieces.
I have a TON of pink… I could make 17 pink quilts tomorrow and still be overloaded with pink.
I’m not a “pink” girl, so I really don’t understand why I have two full shelves of pinks and only one of all other colors…..
Life’s mysteries….
Anyway, so, I grabbed three pinks from my shelf while packing for the weekend. None really spoke to me so I looked around. I had a bright pink in another location (top of the basement freezer actually). It’s a Bella Solid; I bought 7-8 Bella Solids in bulk a year or so ago from a shop owner doing a bulk order. The pink was there along with two brighter greens. The name of one of them is “pistachio” which should give you an idea of the color family.
The greens did call out to me, so I grabbed them too and packed them into yet another bag to drag to retreat. I swear, I pack everything but the kitchen sink!
Once I pulled all the mystery pieces out of my bag, and laid them with the pinks and greens, it was clear that the lighter/brighter of the two greens was the best choice. It still gave me the “opposite” look to the other background that I was looking for. Nothing mellow about this one.
I cut all the background pieces that I needed for clues 2-4 (clue 1 was cutting), along with the requirements for clue 5 that I received today (it was Scrap Tamers Saturday), which was all assembly and caught up!
Side note: the opinion from my fellow club members is that I get to claim I’m doing TWO block of the months credit for Scrap Tamers.
One interesting thing is already happening with the mystery. So far we’ve assembled three basic blocks:
v 33 Rail Fence blocks – contains ONLY the main fabrics (red and blacks)
v 16 Nine Patch blocks – each one has six squares of the main fabric and three squares of background
v 18 Friendship star blocks
The Rail Fence blocks are all from mains, so they look alike across both sets. I’ve mixed them up together and will just be grabbing as I go. The Nine Patches are basically the same – the background pieces just add different colors. However, the Friendship Stars are REALLY DIFFERENT. For some reason – luck of the draw since I went totally scrappy – they are mostly black for Mystery #1. I think only four are red. Also, there are two of each fabric, with very little difference. The two reds that are in them are also very dark and small prints. This gives a set of blocks that are very mellow.
However, the Stars for Mystery #1 are each different from the others, brighter colors overall and then have a bright background. They really POP. It’s going to make a huge difference in the quilts and I’m very anxious to start assembling!
Irish Mist
“I know I had a plan but I can’t remember what it was”
On October 30, I posted about getting the borders for my Irish Mist quilt. That must have been the day I finished it (or a day or two before) since I posted a picture as well. Those border fabrics and the quilt top have sat folded up in my project box ever since.
Three and a half months and all I had to do was sew on two borders….
See, this working from a list, and starting no new projects is really, really needed… *sigh*
I couldn’t remember what my plan for borders was. I had ¾ yard of one fabric and 1 ½ yards of the other, so that was a hint to which one was meant to be the wider border… but how wide? I also tend to do: quilt medallion – narrow border – wide border, so I was able to deduce that as well.
The corners of the Irish Mist are a bunch of 2 ½ squares arranged in a scrappy format to make diagonal corners (see in the picture?). The pattern tells you how many of each fabric to cut, but doesn’t give any layout. I went to great lengths to piece the rows and make sure that no two squares of the same fabric wound up next to each other. However, the assembly of the quilt is a little odd. It’s a rectangle, not a square, and not done four-way symmetrical. Somewhere along the way, I think that I flipped around a couple of the rows or something. There is ONE spot where two of the same fabrics touch.
Ana noticed it right away!
Damn that girl – she’s got the artistic eye when it comes to quilting
I can’t get anything past her!
It is about 70x90 – a good size for my bed. This is the first all batik bed sized quilt that I’ve completed and I am keeping it. I never used to like batiks but they’ve grown on me.
Pink Floral Scrap Table Runner
I made a quilt at Fall Retreat – a large lap sized – out of some quilt shop quality fabrics (i.e. expensive). I had a couple block pieces left over and didn’t want to throw them out. There were only four pieces, but they were big enough to put together into a small topper. I had done that a few months back and it was sitting in my project box. I pulled it out and started looking at fabrics to border it with. Although it is very nice quality fabrics, I don’t think that the blocks stand out much. My plan is/was to pop the center design a bit with bright, narrow borders and then put a wider border on for embroidery. I really like putting flowers or designs in either two or four corners to make a plain piece special. I do this a LOT with scrap pieces.
The first piece of fabric that caught my eye was the strip that Ana trimmed from her Chocolate Covered Cherries quilt backing when she laid it out. The focus fabric in the topper is a pink floral. The quilt back is a bright pink – step one in making it POP. Next, I went with a narrow white border, and last, I dipped back into the green Bella Solids that I grabbed at the last moment for the wide border. They all went really well.
Here’s a picture – but remember, I’m still going to embroider the corners. I’m thinking to only do two corners. The whole thing is very symmetrical, but a rectangle. I’m thinking that two corners only embroidered will give a different look to the whole thing.
The quilt that these center pieces are leftovers from is vastly different from this piece. The colors in it are very soothing, and it’s far more a pastel piece than this. I really love doing the same pieces/main colors/pattern, but changing up one element – such as the backgrounds in the Scrap Tamers’ Mysteries – to create a study in color with vastly different results.
Charm Pack Pattern
The last think that I worked on at mini retreat was a Charm pack that I’ve had in my project box for a long time. I’ve pulled this out from the previous section because I’m going to discuss pattern and give some directions.
I love charm packs………
I buy many of them………. (I also buy other precuts)
Many of them sit on my stash shelves for long periods of time….
Charm packs are cool, but they are also very hard to make into usable pieces.
v One charm pack will make a nice table runner or table topper
v Two charm packs (same or complementary) will make a nice lap quilt
v You need four or more for a bed quilt
But, and here’s the big problem – what pattern do you use? You only have little bits of MANY different fabrics. You can’t make a lot of the different blocks….
The Tossed Nine Patch pattern is EXCELLENT for charm packs. (See this post for directions). However, I’ve made at least a dozen quilts with that pattern – and three come to mind as being from charm packs.
Basta! (enough in Spanish)
So, I’ve started looking around for new patterns using charm packs. Glad Creations Quilt Shop has a small quilt hanging that I really like the pattern on. I think that it was made from yardage, but after staring at it a few times (I go to that shop a lot…), I figured out how to make a variation of it for Charm packs.
Ana really liked a line of fabrics we kept seeing on a Shop Hop last fall. I wanted to make something for her out of it, but she would have noticed me buying any yardage. Also, I wasn’t sure what color she’d want, which of the fabrics she liked best, etc. At one of the stops, there was a Charm pack! I bought it, and tried out my new pattern.
On the same shop hop, I found a single charm pack of fabrics that I loved. They are purple/green/brown/beige and the whole combination of patterns just really appeals to me. I figured that I would make a lap quilt. However, there was only ONE charm pack. The owner of the shop even dug around in a couple of closets to verify.
Nope, no more… L
Next best thing – make a table topper. The colors will go nicely with my favorite tablecloth (its deep purple).
Instructions:
Needed:
v One charm pack
v Block “sashing” (not really sure what to call it) approximately one yard of a fabric (small print or solid) that complements all Charm squares.
v Center squares for blocks - ¼ yard of another neutral fabric.
1. Cut each charm square on both diagonals to create four small triangles.
2. Cut 1 inch strips WOF from the sashing fabric and then sub cut into 3½ inch pieces. Note: You will need TWO for each charm square. Calculate how many.
3. Sew a sashing piece onto one of the triangles from each charm. Sew them onto one of the short sides (next to the 45° angles). Sew another triangle onto the other side of the SAME sashing piece. Repeat with the other two triangles from the same charm square. Press the seams AWAY from the sashing fabric on all pieces.
You should have two pieces that look like these trianlges for each charm pack. A sample of the 1 inch x 3 1/2 inch sashing pieces is on the right.
4. Make center sashing pieces: Cut two 3 ½ strips WOF from the sashing fabric and a one inch strip WOF from the center square fabric. Sew them together: Sashing – center – sashing, so that you have a strip set that is 7 inches wide. Press the seams TOWARDS the sashing fabric. This will allow you to match seams when you assemble. Sub cut the strip into 1 inch wide pieces. Note: you need one for each charm square; you may need to make additional. See step 5 if you need more, otherwise skip to step 6.

5. OPTIONAL: you should be able to get 40 sub cuts from step 4. If you have MORE than 40 charm squares, you need to make more center sashing pieces. Cut 1 inch strips, WOF from the sashing fabric. Sub cut into 3 ½ pieces – you need TWO per center sashing piece – calculate. Cut a strip WOF from the center square fabric. Sub cut into 1 inch pieces – you need ONE per center sashing piece. You will not need more than one strip WOF from the center square fabric unless you are making a TON of these blocks.
Assemble the individual center sashing strips by sewing a center square piece onto the short side of one sashing strip and then sewing another sashing strip onto the opposite side of the center square. Press the seams TOWARDS the sashing fabric.
6. Assemble blocks: Sewing a charm triangle piece onto a center sashing strip – match seams. Sew the other charm triangle onto the other side of the center sashing strip. Repeat for all charms. Make very sure that you “reassemble” the four pieces from the SAME charm square.
Your blocks should look basically like these:
7. Press the blocks and square them. I am a bit of a sloppy piecer so I square mine to 4 ½ inches. If you are a precision piecer, you might be able to get the blocks larger.
8. Assemble any which way… use more sashing, or other blocks, or just put them all directly next to each other (what I’ve done).
Project List
Last thing….
I have put my project list on Google Docs and linked it from here. It was getting long, and really adding to the posts. If you want to help keep me honest – go take a look at it!