Saturday, October 13, 2012

Quilt Retreat

Annual Retreat… Yay!

Last weekend was the annual retreat for my quilt group.  I got there in the afternoon on Thursday and left on Sunday.  Despite having two full days and two partial days to sew, I am nowhere near caught up on projects. 

I had fun though!

So, let me talk about the trip….

I take a crap load of stuff to retreats.  

I’m an ARTIST… I may want something…. I need to take it ALL. 

Good thing we have both a minivan and a truck…. Maybe…..

Chris was racing over the weekend, in Cedar Falls, Iowa.  Because of the long drive, he was trailering the race car and needed to have the truck to pull it…. Ok, truck is out.  Since the weather is cold, I don’t need AC in a car, so I decide I’m going to take the minivan.  Plenty of room in it.  Just Ana and I going.

I’ve managed to lose my key to the minivan.  This is not a monumental occasion.  I lose keys… a lot… there’s a reason there’s a keypad on our front door and that my primary vehicle has a sensor rather than needing to insert a key. 

Wednesday night, I leave a note on the kitchen table.  It says “van keys?”

Thursday morning, I get up, and the key elves have left a key to the van on top of my note.  I take the key and head out to the van.  Key in ignition… start…

“Click, click, click”

Yeah, about that.  The battery is totally dead.

So, I’m a capable woman, I can start the battery with another car, or the booster.  But, what if the battery is toast and this keeps happening?  Remember, this is the minivan that we’ve already replaced and are in the process of selling as a “running but needs attention” vehicle.  I don’t trust it.

I then take keys for both my Challenger and my Commuter car (Chrysler 200). 
·         Open 200 trunk
·         Stare
·         Open Challenger trunk
·         Stare
·         Repeat a couple times

Yea, despite mileage sucking on the Challenger, its trunk is much bigger.  Oh well, Amery isn’t that far.

Car Issues

I have to take a quick break here and detail some things with cars for my audience.

I respect cars.  I can handle a kick ass muscle car better than most women.  I can also drive a big truck, a motorcycle, stick shift, etc.  I routinely switch back and forth – even in winter – between rear wheel and front wheel drive.

However, I am a magnet for weird things with cars.  Cumulatively, I drive ¼ or less of the miles attributed to the household vehicles, yet things that cannot be controlled ALWAYS happen to me!

Let’s just go back a few years

·         Quilt Retreat in Rochester a few years ago:  Minivan – A/C compressor seizes and van is stopped dead in tracks.  Called AAA and rented a car to get home. 
·         Six months later, same quilt retreat facility:  My Sebring – Blew the engine completely.  That particular engine had a flaw, 55K miles and it went on me, six months short of warranty expiration and was replaced under warranty
·         Couple years ago, about 18 months after the first retreat, Florida trip:  Minivan – A/C compressor seizes again while I was driving.  Chris did 95% of the driving on that trip but it seizes on me.  Fixed at a shop in Iowa.
·         October 29, 2010, driving to Wisconsin Dells:  Minivan – dead deer in the road, I ran over it.  Significant mostly because of the next item….
·         October 29, 2011, driving back from a local “mini” quilting retreat:  Minivan – while driving on a major road, a deer runs into the side of the van.  Inner City!!
·         A couple weeks ago, driving to work:  Challenger – tire blowout.

So, it totally doesn’t surprise me that the van failed to start.  Me and cars are just a natural magnet for trouble.  Throw in the quilting element and it’s a disaster.

I had control over NONE of these things!!!

Which brings me to Google maps. 

Ana and I got to the center of Amery and plugged in the address for the retreat facility.  We took a turn.  The GPS (based on Google maps on Ana’s phone), told us to proceed 600 feet and turn right.

As the phone was telling us that – this is the view from the passenger’s side of the car.


Hitting the Road

After determining to utilize the Challenger for the trip, I proceeded to pack the trunk.  I figured that I should use the trunk, and anything of Ana’s could use the backseat.  She just doesn’t take as much as me.

I succeeded in getting everything into the trunk.  However, it was arranged as a jigsaw puzzle and it was necessary to reverse the order exactly.

Ana and I started with a nearly two hour lunch at Akita – our favorite all you can eat sushi place in Woodbury.  We then went to her place in River Falls and packed the backseat with her things.  I moved into the passenger seat and slept most of the way there. 

She claims I snore

I do NOT….

Food Products in Cheese Head Land

I wisely avoided the local quilt shops (I have way too much and we didn’t need anything else in the car!!), but we made two shopping trips to local places. 

On Thursday night we hit a local grocery store.  Here are a couple items of interest:


On Friday, we went into the nearest “big” town and to the Wal-Mart.  This is what amused us there:


And, one last point of humor… Or so I think so, but Ana wasn’t as amused… a heart shaped potato at dinner:


What I Did Over My Summer  Mid Autumn Break

I worked on a bunch of little things, and did some major organizing of my project box.  However, my big project was to catch up on my pieces for the Glacier Canyon quilt.  It’s a six month class and each month we do one “technique” and the blocks for that section.  I’m doing two of them:  One in beige/green/pink/purple batiks, and the other in blacks and whites.  I caught up on pieces for both, but I only brought the other pieces for the batik one.  Here’s a picture of the pieces laid out:


While I was off sewing, my hubby won Trophy Class on both days in Cedar Falls.  This is what my kitchen table looks like now.


The pumpkins were brought home from a farm when Chris, Brandie and I went and did harvest celebrating.  We did a corn maze, played in a corn pit, bounced in a pumpkin shaped bounce house and then headed to the field for a BIG pumpkin.  Here we are heading off!


Glass Work

As I write this, I’m sitting here with three cuts from tonight’s time at the studio.  One will require a Band-Aid for a few days.  Tomorrow is Open Torch at Potek Glass studio; let’s see how many more Band-Aids I can add to the mix!

When I was working in the studio tonight, Karen – the owner, looked at my latest piece and commented on my unique style.  She also stated how much she likes it, but I took the style comment much more to heart.  Many artists are mimics.  To truly have your own style is very hard to do and the best compliment that I think any artist can get!!!

I made another large (24 x 8 inch) piece in my style tonight.  I’ll post pictures of it when it’s fired.  Its and orange/red/yellow based piece.  I also made two smaller (about 6 x 8 inches) pieces.  One is purples and one is blues.  Both are meant to be desk display sizes.  If they turn out nicely, I’m going to buy some nice display stands.  The purple one is for me…. Obviously!

Etsy Store

I started an Etsy store!!!  I’ve only put my bigger glass pieces on it at this time.  It’s there mostly to let some people look at the bigger things.  I do, however, plan on taking pictures of jewelry and getting them up there soon.


Custom orders accepted!!!

New Style

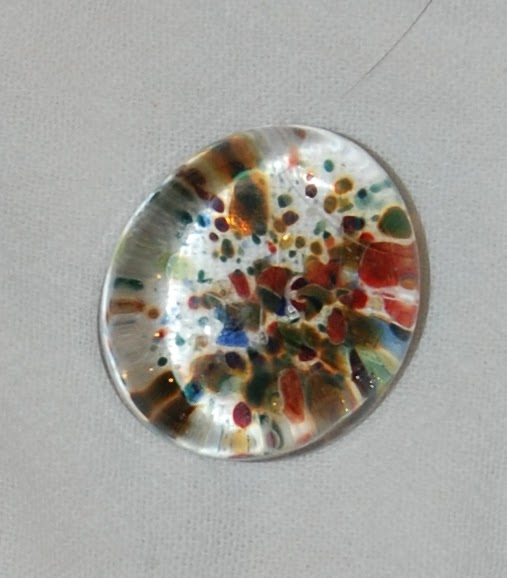
After seeing some things on Pinterest, I tried my hand at working on a new style.  Here is a picture of one piece:


Now, let me describe this.  I put down a sheet of clear glass.  Then I sprinkled powdered glass on it, drew some lines in the powder, etc.  Next, I put pieces of different colors of glass on top, creating a second layer of solid glass – just in different colors.  Lastly, I decorated the top with frit, powder, stringers, etc.

The effect that I was going for – which is VERY hard to see in these pictures – is different textures between and on top of the glass – a 3D effect if you will.

Misc


·         12 inch striped plate with embellishments


·         10 inch layered squares, sushi plate shaped


·         Striped soap dish – just a fun little piece for my house


And that’s all she wrote…

Say goodnight Gracie……


Sunday, September 30, 2012

Soft glass... Hard glass...

Cat picture of the day… They love their treats!


Why I Like Fused Glass

Aka – I suck at organic art

Definition:  Organic art is things that you have to shape and form – sculpture, painting things free hand, etc. 

Brandie is really good at free hand things. 

I am not….

That’s why I really, really enjoy both quilting and fused glass work.  Use a ruler, cut your pieces to size and put them together using the method for that art/pattern/piece.  It works and looks nice.

Yet, I trying Torch Work – a more organic form of working with glass.

Beads: 

Every month, on the second Saturday (because there’s a price deal), I go to a studio in NE Minneapolis and work for three hours or so with a torch.  I took their basic bead making class and that’s what I’m practicing. 

I break a lot of beads – some shatter before I get them into the kiln to anneal, and some break after annealing.  Last time I broke fewer beads than I didn’t break – so it was a good month!

I’m collecting all of the broken bits.  At some point, I’m going to lay them out on pieces of sheet class and tack fuse it in the kiln.  I will buy a nice display stand and put the piece on display in my house with a placard that says:  “Mary’s Screw Ups”.  It will certainly be an original piece.

Here are the “broken after annealing in the kiln” beads from September.


But, in my defense – some of the beads I make DO turn out… they may not be the best, or prettiest – but I will do something with them someday and I’m proud that I made them!

Here’s the batch from September that DID turn out:


I am particularly enamored of putting dots onto the beads that stick out and I think I’m getting better at it!

Borosilicate

Fusing glass is pretty “soft” as far as glass goes.  You have to use glass that is all rated the same COE (Coefficient of Expansion) so that it behaves nicely in the kiln and doesn’t crack.  There are two COEs that people use with fusing – 90 and 96.  You can’t mix them and I take care to keep mine separate.  The glass rods that I get for making beads with is softer – 104 COE – and is often referred to as “Italian soft glass”. 

There’s another type of glass that is also melted with the torch and formed into shapes, etc., when hot rather than using the kiln – Borosilicate.  It is a HARD glass – 33 COE.  It is what paperweights and other things like that are made from.  I took a class in it from the same place that I make beads at.  They gave me a coupon for half off the classes and I figured since I like glass so much, it behooved me to try everything!

Again, I suck at organic art.

Here’s just some practice shapes:


Neither bad nor good – just practicing.

But, these are truly bad.  They are supposed to be icicle ornaments.  I have the technique down, but I have absolutely no control when it comes to evenness of shape!


They are still so going on the tree!  If I had to display bad ashtrays and coloring book sheets in order to be a good mother – these things are going on my xmas tree and all the kids better ooo and ahhh over them!!!

I was better at the mini paperweights.  I still have to work on my rounding of them, and get a little precision in there, but – overall – I think these are decent!


Plates

12 inch plates seem to have become my specialty in fused glass.  It’s a nice size, useful, and a large enough palate to really do something with.

However, I don’t usually use the 12 inch plate mold for them; I use the 14 inch plate mold so that there is a smaller border/edge/lip of the plate.  You can see what I mean in the following picture.  These are two of my plates – both using the “crackle” technique.  The purple one is done with the 12-inch plate mold, and the green one is done with the 14.  Notice the difference in the centers and the width of the lip?


Green Diagonal Plate

I’ve been playing with diagonals lately.  I saw a piece done in diagonals in a studio a few weeks back and I’ve just sort of jumped on it.  Diagonals are fun (and a little frustrating!).  The hardest part of it is that I buy mostly 12 inch squares of glass.  When I decide to make a 12 inch finished piece, I can’t cut a single strip of glass to make the longest diagonals.  Remember the Pythagorean Theorem from High School?  A squared plus B squared = C squared?  The middle of the 12 inch piece is a bit longer than 12 inches!  I have to carefully cut even width pieces and place them end to end.

Here’s a 12 inch diagonal piece that I did in greens:


I also did “My Style” embellishments on the top of it (stringers melted into shapes).

Green “Mosaic” Plate

I’ve also been using this technique a lot.  I put a border on a clear (or opaque) square of glass, sift powdered glass into the center, and then cut up lots of small pieces and lay them out.  It’s an excellent way to use up all those little odd bits that I wind up with! 

Here’s a picture of my latest fused mosaic.  This too is a 12 inch square plate slumped into the 14 inch plate mold.  Yes, I used some of the bits from cutting 45 degree angles on the green glass in the diagonal piece right about this.

<PICTURE>

Shameless Plug

I now have an Etsy shop for my glass!!!

<fanfare>

<more fanfare….>

The shop is FridayDesigns2012. 

And Another Brag

We had a dinner party at the house a week or so ago.  Four of my 12 inch plates were used to serve the delicious Middle Eastern food that out house guests cooked for us.


Saturday, September 22, 2012

Didn't Cut Myself Today with Glass

I’m only going to post about glass today. 

I’m still behind on quilting, but retreat is coming and I WILL catch up on some things!!!

First of all though – Cat picture of the day… Bronx and Ariel


A New Technique

I spent a bunch of time looking through Pintrest last week and then went to the studio.  One can really, really lose themselves on that site!  I wrote down a few things on a note card and then tried something out.  I think it turned out well.

First, I took a clear sheet of glass, and I shifted powdered glass on it.  Several colors and random amounts…  Then, I dragged the end of a spoon (which I used to scoop the powdered glass from the jar to the sifter) through the glass to make some random lines.  Ironically enough, when I make plates with the crackle technique – which also involves sifting powdered glass onto a surface – I try VERY hard NOT to make lines in it; the opposite of what I did here!!!

Next, I cut out pieces of glass to match the basic color scheme (green in this case), and made the second layer of glass.  I didn’t worry about it being a solid top sheet, but rather pieces together enough to cover.  This made a patchwork look to the piece.  Now I had three design elements going – the sifted powder, the lines, and multi colored top.

I covered the top layer with a variety of pieces.  I threw organization to the wind!  Medium and coarse frit were sprinkled, a little more powdered glass, chopped up some stringers….. 

The kiln ready piece looked like this.


I really had no idea how it would turn out.  Would the powered glass show?  Did I put it on too thick?  Or too thin that it wouldn’t even appear?  What about the scraps on top?  Would they be just that – Scraps?  Was this a garbage heap of design?  Would this look like I just threw things on it?  (Ok, fair enough, I did just that)

Here’s the final piece – after slumping.


I’m happy with it! 

What do you think?

Blue Pieces

I’ve been working with blue a lot lately.  Not sure why… it isn’t really up there in my favorite color list.  I’ve been finding some good blue glass pretty cheap/reasonable at the shop, and I have several friends who love blue, so I guess that is inspiring me.

Here are a couple pieces with some different techniques.

Yes, I know I really have to take better pictures – these don’t do it justice.  I promise a nice photo shoot soon and I’ll give a link here to my photobucket site where I will store them.

Blue Nubby

This piece is made with a sheet of clear, border pieces and then scraps through the center making a mosaic.  Since I don’t have my own kiln yet, I let Karen – the owner of the studio I spend a lot of time at – make decisions on firing.  She usually fuses my pieces fully.  For some reason, this one was done with a “relief” fuse… maybe that’s the cycle she had room for it.  I wouldn’t have thought to choose to do it that way, but I’m really happy with it.

A relief fuse is a lower temperature/time, and the glass doesn’t melt out fully flat as in a full fuse.  A “Tack” fuse is even less temperature/time, and the pieces just round on the edge.  This one is smoother, but there are discernible lumps and a texture when you run your fingers over it.


Blue Diagonal

I’ve also been fixated on diagonals lately.  I guess I like testing myself on cutting 45 degree angles!

This piece was slumped into a deeper “sushi” mold and is dramatically curved.  I have a plan for it, but I can’t tell here yet; can’t give away a secret.  Remind me in about a month if you haven’t heard more about it.


I did a couple other little things on this – look for them.  I laid stringers and noodles – as well as marbles – on top of the diagonal strips.  Rather than doing my “squiggles and curves” on top of straight lines – I put straight lines on top of straight lines!

More with Stacked Pieces – AKA Scalloped edges

Look back through my posts and you will see several pieces – including a vase – where I use the technique of stacking a square on a square.  The edges round slightly and it’s a cool look.

This time, I learned something new.  It’s a smaller piece (6 inches) and I stacked a lot of squares on it, and fairly close to each other.  Now, if you remember from earlier posts – I’ve discussed that when glass is fully fused, it tries to melt out to ¼ inch thick.  It likes that level.  This piece has a single layer of base; it does NOT have a full two layers of glass at all points.  Then, some areas have four layers.

It had to adjust itself. 

What happened was that the white areas – which are single layer – between the stacks, pulled in closer to the center (to build up thickness).  This results in a scalloped edge to the pieces.

I really didn’t know that that would happen!

It’s cool!!


So now, I have a piece going into the kiln that is similar, but has even more layers to the stacks! 

Red/Black and Gold

Boring….

Just another of “My Style” pieces…

Ho hum….

J

I like it.  It’s a cool combination of colors.  I could make these all day!  I love cutting out pieces, fitting them together, and creating a unique design each time.

Can you tell I really used to love puzzles?


More Pendants and Semi Failed Experiments

Pendants

I had a tiny bit of the hand rolled glass left (actually, I found two more small pieces when cleaning up tonight, so you’ll hear about it again) and I made a couple more pendants.  They are just fun and easy to do.  These ones have channels done with fiber paper like the others, but they really tucked in at the openings!  I think they’ll look really nice with a chain run through them.


Beads – Set One

I took some small pieces of the rolled glass, put clear over, fiber paper inside, and tried to make beads in the style of the pendants.

They’re ok, I guess.  I’m not too impressed.  I’ll post some more pictures later when I incorporate them into a necklace.  Maybe I’ll be happier then.


The edges around where the fiber paper was were quite rough.  I need to use the grinder on them – else they’d slice up the neck of the wearer.  That’s probably jading my viewpoint slightly on them right now.

Beads – Set Two

Even less happy with these.  I put the left over squares from the scalloped plate on top of squares of white.  I off set them (45 degree turn), and put fiber paper through the diagonal.  My hope was that they would round out nicely.

They didn’t.

I ground the edges on these too…


At this stage, I’m hoping that they will make a nice abstract necklace…

Yea – I meant them to look that way…

Really…

I think they look like something out of a bad sci-fi show....

*sigh*

Taught a Class

Not really, but that’s my story and I’m sticking to it….

I was working in the studio today.  The only other person there was one of Karen’s staff who was manning the store and working on her own projects.  It was quite quiet. 

A couple came in and wanted to make some art.  Painting ceramics didn’t appeal to them. 

Maybe it was the fact that Karen (studio owner) was not there, but I was embolden and suggested to them that I could teach them to make a fused project.

That appealed to them.

I discussed glass with them, taught them to cut pieces, shared some of my scraps (they bought the big pieces out of Karen’s stock), and was impressed with what they created!

I didn’t get paid anything, but I increased Karen’s sales for the night, and hopefully got her a couple new customers!!  I really enjoy the studio, and think that Karen is really a neat person.  I loved the ability to contribute in a positive manner to her business.  Don’t worry though – I told them from the start that I wasn’t a teacher there; just someone who wandered in one day and now they can’t get rid of me.

Advertising plug:  The Studio at Rush Creek.  Click HERE for their website and click HERE for the class list.  Take a class, drop in and paint some pottery, take your laptop and have a delicious smoothie or coffee drink in the coffee shop part, buy a piece of readymade local art if you don’t want to create your own.  Just let Karen know that I sent you!!!

(Side note:  the husband actually caught on to cutting glass quicker and better than the wife – and he didn’t even want to do his own project in the first place; he was just going to watch!) 

My Dishes Put to Use!!

I will update this later when I get the pictures.

We have house guests. 

“Couch Surfers”

We’d never met them before….

Really!!!

I’m active in a community called “couch surfing”.  It’s a network of people who share their homes (often just a couch) with other like minded travelers.  I used the network when I went to London two years ago.  Although we’ve had lots of people stay with us through other networks (church, school, friends, and once another forum), this couple was actually our first request through the couch surfing network.  It’s not for everyone, but I like it, and this worked out very well.

Note:  if you decide to follow my footsteps and use/offer couch surfing, my biggest words of advice are to first meet the people in a public place.  I have a fantastic BBSI (Build in Bullshit Indicator) and sum people up pretty quickly.  That first impression in a public place is all I need to put my mind at ease.  Most people who participate in this community are open minded, honest people looking for more personality out of their travel experience.  Only once have I been contacted by a person (ride share actually, not house sharing) and decided to turn them down completely.

Ok, back on track

Our house guests - She is French, and he is Syrian.  On their profile, it states that they love to cook, and cook Middle Eastern cuisine.

So, I asked them to cook for a dinner party.  I bought the groceries at the local Middle Eastern Market, and invited a bunch of friends.  We had five ethnicities/heritages, and a similar number of languages represented.  A great evening was had by all.

How does this fit in my post about glass?

Well, I’ll tell you!

We used four of my 12 inch plates for the serving dishes for the Syrian/Saudi Arabian food.  We piled them high with rice and bulgur dishes and laid them down the center of my 1920s American crafted table, on top of my very Italian looking 8 foot table runner!

I will show a picture when I get one….

Promise

Sunday, September 9, 2012

I’m going to post twice in a weekend!! Woo hoo! 

This post is going to be a little shorter though…

Over Scheduled!

I didn’t realize when I signed up for things, that TCQ Block of the Month, the Glacier Star class and Open Torch (glass bead making) would all fall on the same Saturday…..

Normally, I go to the 10, or even 11 am session for Block of the Month.  The Glacier Star class is 10-2, and Open Torch starts at 1:30… so, 9 am session it is.

I call the Second Saturday of the month:  Busy Saturday.

Normal “Busy Saturday”

·         8:00 – get up
·         9:00 – Block of the Month
·         9:45 – leave TCQ
·         10:00 – Glacier Star at Glad Creations, start on the new month’s technique
·         1:30/2:00 – leave Glad’s
·         2:00/2:30 – Open Torch
·         5:30 – done

Today

·         12:15 (night before) – return home from dinner and finish the blocks that have to be brought in to get the new fabric
·         4:00 – go to bed after writing blog post and other stuff
·         4:45 – while reading in bed, discover lump in breast (cyst most likely, but still annoying and worrisome), use ipad and Allina ap to schedule appointment
·         8:15 – get up
·         8:30 – discover that the milk has gone bad
·         9:00 – block of the month
·         9:25 – sudden realization that all the fabric for Glacier Star is sitting in the living room
·         9:30 – grab handout for Block of the Month and race home
·         10:00 – Glacier Star  (Note, I’m doing two – one in Batiks and one in Black and White)
·         12:00 – casual conversation while sewing… I ask the group when “Scrap Tamers” starts up… the answer is NEXT SATURDAY… Yikes!  So not prepared!!!  I haven’t even told Michelle that I signed her up!
·         1:00 – finish up LAST month’s blocks for ONLY the Batik version (yea, I’m behind)
·         1:10 – Start on last month’s blocks for the Black and White version… discover I don’t have enough back ground fabric with me (it’s at home).  Set that aside
·         1:15 – Start on the current month’s technique for the Batiks quilt.  Discover I’m five inches short on one of the fabrics I want to use…. (I don’t need to find more of it, just pick another fabric)
·         1:20 – admit defeat on Glacier Star for the day
·         1:30 – leave for Torch work
·         2:00 – discover that the majority of my beads from last month didn’t turn out.
·         2:30 – noticeable burn on my wrist
·         3:30 – burn on my thumb (not as bad)
·         5:30 – done…..
·         Spend the evening trying to cut out and organize the Glacier Star blocks…. Decide that I need to go to the fabric store and don’t achieve much more than making a mess in the living room.

Beads

I lead into beads, so I better show them here!

Let me give some context around this first.

I’m not an “organic” artist.  My daughter, Brandie is.  She can sketch, draw, paint, make things look real, etc. 

Ana and I are geometric types.  We function well when math and ratios are involved.  That’s why we quilt.  That’s also why I’m drawn to fused glass.  There are people who work with it who do very organic things, but I cut straight lines and organize to my heart’s content.

Beads are far more organic, and I will never be very good at them.  However, I enjoy playing with a 2500 degree torch and making an attempt to make round and cylindrical things that I can wear.  I figure I do a lot of bead stringing – I need to make a few in my lifetime!

Plus, a woman wielding a torch is hot….!  (No pun intended)

Torch work, also called Lamp work, is expensive.  The studio I do most of my fusing at charges $12 an hour to use their equipment….  That’s a lot for something that I’m not good at.  I had a bead failure last time, and only have six or so beads to show for over three hours work… you do the math….

Another studio that I’ve taken classes at is in North East Minneapolis, and as part of an Arts initiative/Open Studios at their building day, they offer “Open Torch” once a month, on the second Saturday.  This special day is $15 for up to four hours of time.  It’s a much better deal for someone like me who is just wasting time and materials doing this!

The studio is in NE Minneapolis – about 6-7 miles from my house, and out of the way for my normal travels.  After making beads on the torch, they are then put into a kiln to “anneal” overnight; they don’t come home with me.  This means that I generally pick up my beads from one month when I go in for the session the next month.

July Beads

In July, I went gung ho with playing around with color, decorations, etc.  Here are the beads that I made that day:


And here are some close-ups of some of the beads:


August Beads

After picking up those lovely beads (some are pretty darned good if I may say so myself!), I set about making more!

I knew even before I left the studio that things weren’t right…. I didn’t feel good making them, things didn’t feel right….

I should know to trust my instincts…

But, before I go there, let me tell you what happened in/out of the torch work session….

First of all, while at the studio, I attempted to burn off the tip of my finger.  A ¼ inch x ½ inch strip on the top of my pinkie on my right hand turned completely white and hurt like hell.  The cause was touching the hot end of a glass rod by mistake. 

It hurt for hours… I hand to wash my hands with my pinkie extended – like in drinking tea from fancy cups.

Before I left, I picked up some of the failure of glass.  Sometimes, when trying to melt a rod and get a good gather to make into a bead, one turns the rod wrong, or something, and drops a chunk of glass.  These bits cool into interesting shapes and I’ve got a few of them.  Some day, I want to take them, and all the broken beads I’ve got, and tack fuse them onto a 12 inch piece of glass.  Said piece will then become a hung piece of wall art entitled “Failures”.

I digress… so, I picked up the chunk and put it in my pocket.

Left the studio, and went out to a movie with Daughter Brandie and Son-In-Law Matt…. As we were standing around talking, I’m doing my usual thing of fidgeting, etc…. I’m playing with the chunk of glass in my pocket, and my thumb starts to feel …. Wet…. Hmmm… pull it out…

My thumb has a good sized gash on it and is bleeding quite well….

I found the one little sharp spot on the chunk of glass…

Luckily, I carry Band-Aids at all times….

All this was simply foreboding…  

I picked up the beads from that day, today, and there were several broken ones.  I started to take them off the mandrels (steel rods) and more than half that were still intact fell apart easily.

Take a look at the picture of the few that survived:


Notice the one in the bottom right?  It’s visibly cracked and probably won’t last long.  I think that this was actually more of a kiln/annealing failure or something else than just me.  I guess when I pick up beads from Today’s session; I’ll have more of a clue as to the blame.