Sunday, December 16, 2012

Embroidery Machine is Up and Running Again


Cat Picture of the Day…..  It needs some explanation.

I've been sick… bad enough that I worked from home for two days.

Most people who work from home get up in the morning, shower, eat breakfast, and sit at a desk or table.  They have a work routine that is separate from their home routines.

Not me….

I’m lazy

VERY lazy

I had a friend call me with a wake-up call, (no alarms for me!), ran down, grabbed laptop, crawled back into bed and worked while propped up with down pillows.

Lazy and spoiled…..

Work clothes were pajama bottoms with cartoon animals on them and a Captain Crunch t-shirt (I also had peanut butter captain crunch for breakfast)

In my defense, sitting at the kitchen table is actually BAD for me.  I have an elbow issue and it’s not ergo dynamically correct.  I need to have my elbows above my wrists… which they were in bed….

So, here’s the cat picture – they are helping me.


Glass

I’m getting anxious!  I haven’t picked my things up from the kiln yet!  It’s been two weeks. 

My excuses: 

  • Two Fridays ago – didn't go to open studio because I was sick.  Barely made it through work.  I left at 4:30, came home, slept until 8 and went to dinner with Ana.  That dinner each week is more important than anything else
  • Last Friday – Chris’s Christmas party. 


The Party

Let’s talk about the party.  There’s actually nothing hobby related to it, so it really has no place in this blogs…

But, my enjoyment is one of my hobbies…..

As an empty nester, I have discovered going to a spa regularly, tanning, working on my thighs… etc…

So – I’m my own hobby!

Also, my hubby is my hobby…. A serious hobby….!

One of the things at the party was a photo booth.  They've come a long way from the 75 cent machines at the arcades that we used to take the kids to.  But, same concept – take amusing pictures of yourselves!  Those were always black and white; now you can choose effects!  Sepia, black and white, color, etc.

I want to rent one and have it at a Christmas party some year!

My husband has a sense of humor and is confident in his masculinity… I love the reindeer ears!


I want to use this for some Christmas Cards:


I also indulged my inner goddess and vamped it up!  Not bad for a 47 year old grandmother!


However, the photo booth award goes to my Son in Law – Eric….. (note - this is from another date, but still hilarious)


 No idea how he did it so quickly!

At least he’s not wearing his boots…..

Fabric 

Scrap Tamers

Today was scrap tamers.  I got caught up on my mystery last weekend at the QQ mini retreat so I felt confident going.  I’m getting a little excited about it….. We've had enough clues now so we have some pieces and I’m trying to imagine what it might be.

The currently monthly Marti and Me pattern (part of the Scrap tamers club) is a patter with a lot of half square triangles.  I might do it just to use up a bunch of squares that I have collected.

Fabric for Lincoln’s challenge

One of the special extra patterns in the “Jo’s Little Women” club of this year was an original pattern by Anne Marie at Glad’s called “Lincoln’s Challenge”.  I cannot show you any pictures on it because she is releasing the pattern.  After she does, I will.

Anyway, the pattern called for a bunch of 5 inch squares in a color way/pattern set.  I chose to use a charm pack from Tonka – batiks.  I actually reversed her color recommendations.  Where she has lights, I did darks and where she did darks – lights.

I absolutely LOVED the end result.  It’s a gorgeous small quilt.

Then, in browsing my favorite quilting sites, I found the layer cakes (10 inch squares) for the same fabric collection.  So, my plan is to make the quilt again, but with the 10 inch squares in place of the 5 inch.  This will effectively make the quilt four times bigger, and with some borders and/or extra blocks, be a decent sized to use on a bed!

I couldn't find some of the other fabrics used in it, but have ones that are VERY close. 

I’m excited….

Now I just need time.

Secret Projects

Still working on my secret projects.  I will post when I get things done and delivered!


Embroidery

My big project of the week was getting my embroidery machine up and running again.  There was nothing wrong with it; I just have too many hobbies and not enough time.


  • Three weeks ago, my friend Cathy’s sister asked me to do some embroidery on a quilt for her grandson.
  • I’m overdue with doing name tags for my quilt group
  • Last week, Nancy asked me to make some more baptismal clothes for the church….

That’s the one that did it… threw me over the edge.

I’m on a mission from God.

(Ten points if you can name the movie, twenty for the actor)

It wasn't hard to get the machine going again… I just had to remember the menus on the screen and get out the strong cheater glasses for threading those TWELVE needles!

Sue’s Quilt

Here are some pictures of the embroidery that I did for the grandson quilt.


All the embroidery is on the bottom inner border.  The trucks are the same except for the color.  I took a close up picture of the letters in the name.  Since they are so large, I didn't do a simply satin stitch, but did a patterned inner fill with a satin stitch outline.  The file for the name was more stitches than BOTH the trucks!

Sunday, December 9, 2012

Avatar

I check Face book with regularity for pictures, etc.  My husband has a strange sense of humor and isn’t afraid of showing his soft side either.

I burst out laughing one evening when I checked his profile….  He put up a picture of the Bengals and posted “I should pimp these cats for cat calendars”

The comments went downhill from there……

Use your imagination….


Bead Making/Torch Work

I haven’t worked with the torch for a while, and don’t have any plans until January.  My schedule has just been so terribly busy.  You’ll have to wait a while after this to hear stories of burns and mishaps with molten glass.

These are the beads that I picked up a few days ago.  They were made in the October Open Torch session.


At the left is the small pile of broken beads.  In the middle/towards the left, is a mandrel with a bead still on it.  The reason for this is that I can NOT get it off.  I’m going to try for a little while more before I give up and smash it. 

It’s a pretty good looking bead.

So, I get a good one right, it does NOT break… but is still useless to me!

*sigh*

Here’s a closer look at the broken beads. 


I’m getting much better with the dots and other decorations.  The worst part about these particular beads is that at least two of them are were near perfect matches for beads that did survive.

Why is that bad?

Well, I have a tin now with over 100 beads that I have made.  Some large, some small, some decorated, some plain.

What I DON’T have, is two identical beads.

No perfect pair for earrings.

Here are some close-ups of a couple of the beads that I’m most proud of.


Both beads are fairly large.  Each is about 1 inch.  Both are made with a single color as the base shape (Orange and Clear).  Then, I took stringers that I pulled from other glass rods (thin strings of glass) and wrapped them around the bead.

People who do this well, get perfect lines and have more complex decorations.

I do not do this well

I call these beads “Impressionism”

And I leave it at that…..


Mini Retreat Today

I’ve been ill lately.  I slept in a bit this morning and then went and got my friend Michelle and we went to my group’s quilting "mini-retreat".  The premise of this sort of event is that we go to a local church (versus staying out of town), for a Friday evening and the whole day Saturday, going home to sleep in between. 

I was greeted quite warmly.  It sort of made me feel bad; I've blown off that group a couple times lately. I’m also blowing off the Xmas party.  I planned going to a movie premiere with my daughters prior to realizing that it was the same night as the group party.  They come first….

I packed quickly this morning, grabbing project boxes.  I managed to get one of my block of the month projects caught up (still one to go).   This particular one is the Scrap Tamers’ Mystery, of which I was two months behind…

(Embarrassed smiley face should go here)

I left the retreat early because I was at a good breaking spot and I was worn out.  Drove Michelle home, and napped on the couch while Chris watched a show.  I needed a nap before doing anything else for the evening; I'm just so run down lately.  I've got the Kathleen Turner raspy deep voice going on too.  Hopefully this will pass soon.

I’d hate to think that I’m getting old…. 

Scrap Tamers’ Mystery


Clue #1 - Cutting

That was done except for the accent fabric.  All my lights and darks for the project are blues.  I had a beige/blue/purple patterned fabric set aside for the accent fabric, but had not cut it yet.  However, when I dug out the pieces today, I had second thoughts about the accent fabric.  It is what you would consider a medium sized print.  My directions today called for 1 ½ inch wide pieces of it. 

Seriously?

That would totally lose the pattern in the fabric.

So, I dug into a bag. 

I had only brought projects; not yardage.  However, one of the projects had a bunch of fabrics from my “medium” stash section in it.  That project was/is a Lemoyne star quilt in which I gathered up a bunch of reds (stars) and beiges (backgrounds) from the ½ - 1 yard pieces in my stash.  The Mystery calls for 5/8 yard of accent fabric.  I pulled out a couple pieces of the red, and one was about a yard, was a burgundy with a lined pattern in it.  It reads mostly as a solid, and the color is a bit muted.  I held it up to the blue pieces and it looks good.


Clue #2 – Four Patches

Long story short: 72 – 2 ½ square four patches

Yes…. 72

SMALL four patches…

Very small….


The method for making them was to piece strip sets, cross cut them into 144 - 1 ½ inch wide strips and then piece into the four patches.  Each four patch has one cross cut from an accent/light strip set and one cross cut from an accent/dark strip set.

I considered it a win that at the end, I had equal numbers of cross cuts (i.e. I didn’t accidentally match two darks or two lights together and create and uneven amount at the end)

However, that doesn’t mean that I didn’t screw up an even number of times and it just LOOKS like it ended up correct

Just saying……


Clue #3 – Strip Sets and Cross cutting

This step also resulted in 144 small cross cuts…..  However, the clue didn’t give any further construction instructions.  Since the cross cuts are wider than the four patches, I’m thinking that I’m going to be adding to them, and then putting these pieces on the sides….

We’ll see

Eventually…


Other Projects

I’m actively working on two quilts right now.  However, both are gifts and both are going to people who read my blog.. so….

“zip”


Avatar

No, not the movie….  

The word existed long before that travesty of a Pocahontas retelling that billed itself as good science fiction.

av·a·tar  

/ˈavəˌtär/
Noun

  1. A manifestation of a deity in bodily form on earth.
  2. An incarnation, embodiment, or manifestation of a person or idea: "he set himself up as a new avatar of Arab radicalism".
I told Brandie that all I wanted for my birthday was an avatar of me.  I gave her a couple ideas and she went with it.

Criteria:  long hair and a Steam Punk twist

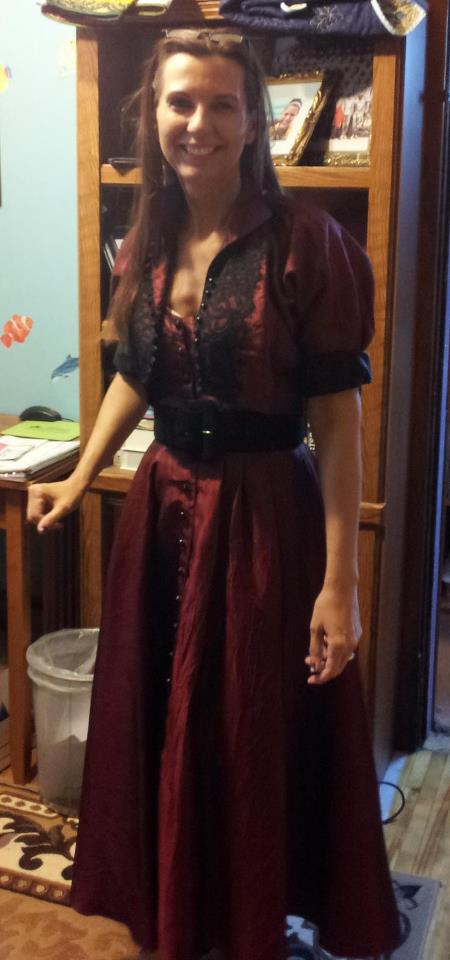
First:  Here’s a costume that I’m working on for Steam Punk role playing.  This is the basic dress; I have boots for it, need some jewelry and other accessories, and a bustier or corset under it as the dress is a little big and the genre calls for a bustier look.


Second:  Here is what Brandie came up with!


She knows me so well!  An avatar is supposed to capture the essence of the person.  Let me point out a couple things:


  • Midriff:  While I don’t often expose my belly like this, my midsection is something that I’ve worked hard on and am proud of
  • Boots:  I love boots.  That’s all I wear in winter – nice fashion boots.  I also always wear heels
  • Those are NOT sunglasses on my head… They are goggles – tribute to Steam Punk.  They are also purple!  My favorite color. 

Saturday, December 1, 2012

Updates and Expiraments

So, I’ll start with the cats as has been my tradition as of late. 

Bronx – my oldest male cat is a F1 Bengal.  He is very true to breed – just take a look at how long his nose and paws are compared to other housecats.  Additionally, he epitomizes breed by being aloof, and not wanting to be held.  He’s not a “pick up and cuddle” type of cat.

Despite that, and much to my chagrin since I am the primary treat giver of the house – Bronx likes men – he usually picks the strongest man in the room (alpha male type strong, not physical) and commands that they honor him.  Bronx prefers the strong, silent type; generally the person who is either ignoring him or expressing apathy.  This honor is fulfilled by him sitting on their lap and surveying the room.  He is NOT asking to be petted, and don’t you dare try to hold/cuddle him from that.  He’s there to show he’s king.

A couple weeks ago – our friend Rich was over.  Rich was sitting in hubby’s usually spot on the couch, and is a similar in temperament to Chris.


Notice how he is watching the room?

Annual Vacation

I just got back from our Annual vacation to Daytona Beach.  Each year, I pack some handwork projects to do, and last year I blogged from there about the beautiful fabric orchids I made.  I also usually put in 20-30 hours of work

This year, I was naughty on all counts
·         I went to the hot tub almost every night
·         I stayed up late and slept in
·         I swore I was going to do yoga at a nearby studio every day – I went once
·         We went to a movie
·         We did go karts, nitro dragsters and the arcade
·         I bought clothes and lingerie
·         I sat in the sun and read books
·         We went on an Eco Tour
·         We went into Orlando to our favorite CD shop

It was a nice vacation, and despite taking a bunch of yarn, crochet cotton, knitting needles and crochet hooks along, I did very little. 

I had taken a good amount of specialty yarns that I’ve collected – intending to make some scarf/jewelry pieces and a few other things.  I did use up one skein of an expensive yard to make the basis for a decorative belt.  I need to finish it off with some complementary yarn to make a fringe.

Here’s what I have:


And here’s the yarn I used.  If there’s a few yards left after fringe, I’ll pair it with white and make a tie scarf/neck drape.

I also started a scarf.  It’s decorative rather than functional.  My goal is to use up two skeins of white eyelash, one skein of pink/beige cotton yarn and at least half a skein of a multi colored ladder yarn.  The rest of which will be used for scarves


Quilting

Original Sewing and Quilting Expo Review

 Not worth the price – don’t go.

Oh, you wanted more than that….?

I can do that.

I started going to this event about eight years ago.  I was at the Sheraton in Bloomington, took up several large rooms, some small rooms, and the hallways.  It took 3-4 hours just to wind through the selling booths, and I got a lot of great stuff.

It went downhill from there; it’s been getting consistently smaller and this year was awful.

In past years, there have been many sewing/embroidery machine dealers and at least THREE commercial/semi commercial embroidery machines on display.  This year:  NONE, just the Viking dealer.

It took me under an hour to see all the selling booths. 
·         No big collections of fabric anywhere
·         No Hancock (but not a big loss)
·         Only one booth with any amount of pre-cuts, and barely any
·         Vogue fabrics which used to have a HUGE booth, with tons of notions, softwares, etc., was not there at all
·         Barely any show items

I won’t be going again.  I’ll stick to the MQ show which has a ton of booths and lots of displays.

Elinor’s Tree Skirt

I buy fabric because I like it…. Not for a particular project.

That’s one reason why I have a very large stash….

Lots of things attract my attention…

It also could be because I’m a bit of a hoarder ….

Or that I NEED to have a large palette to choose from….

Or that I’m just crazy…

Just saying…..

Anyway, on one of my many shopping expeditions, I found a charm pack of Christmas themed sock monkeys.

Yes…. I said Christmas themed sock monkeys… don’t those two concepts always go hand in hand?

After all, there are PINK sock monkeys too…. Here’s proof!


Back to the subject intended…. Shortly before I was going down to Albuquerque to visit Elinor (and it was near Christmas time), I decided I needed to bring something.

Or, I may have decided that I needed to start clearing out my collection of “I must do something with this” fabrics…..

Either way, I took that charm pack and made a small quilt out of it.  The pattern that I used was the “Tossed Nine Patch”.  You can refer back to one of my first blog articles here for some directions.

This year, Elinor has decided to use the quilt (it’s about 35 inches square) as a skirt of sorts for their small Christmas tree.  Her comment in text when she sent me this picture was:  “2 people have already compliment/asked were (sic) they can get one J”

Twin City Quilting Block of the Month

I’m still plugging away at the BOM.  I missed last Month (November) to go to the Original Sewing and Quilting Expo (should have skipped that instead), and I still have to go pay my $5 penalty and be contrite.

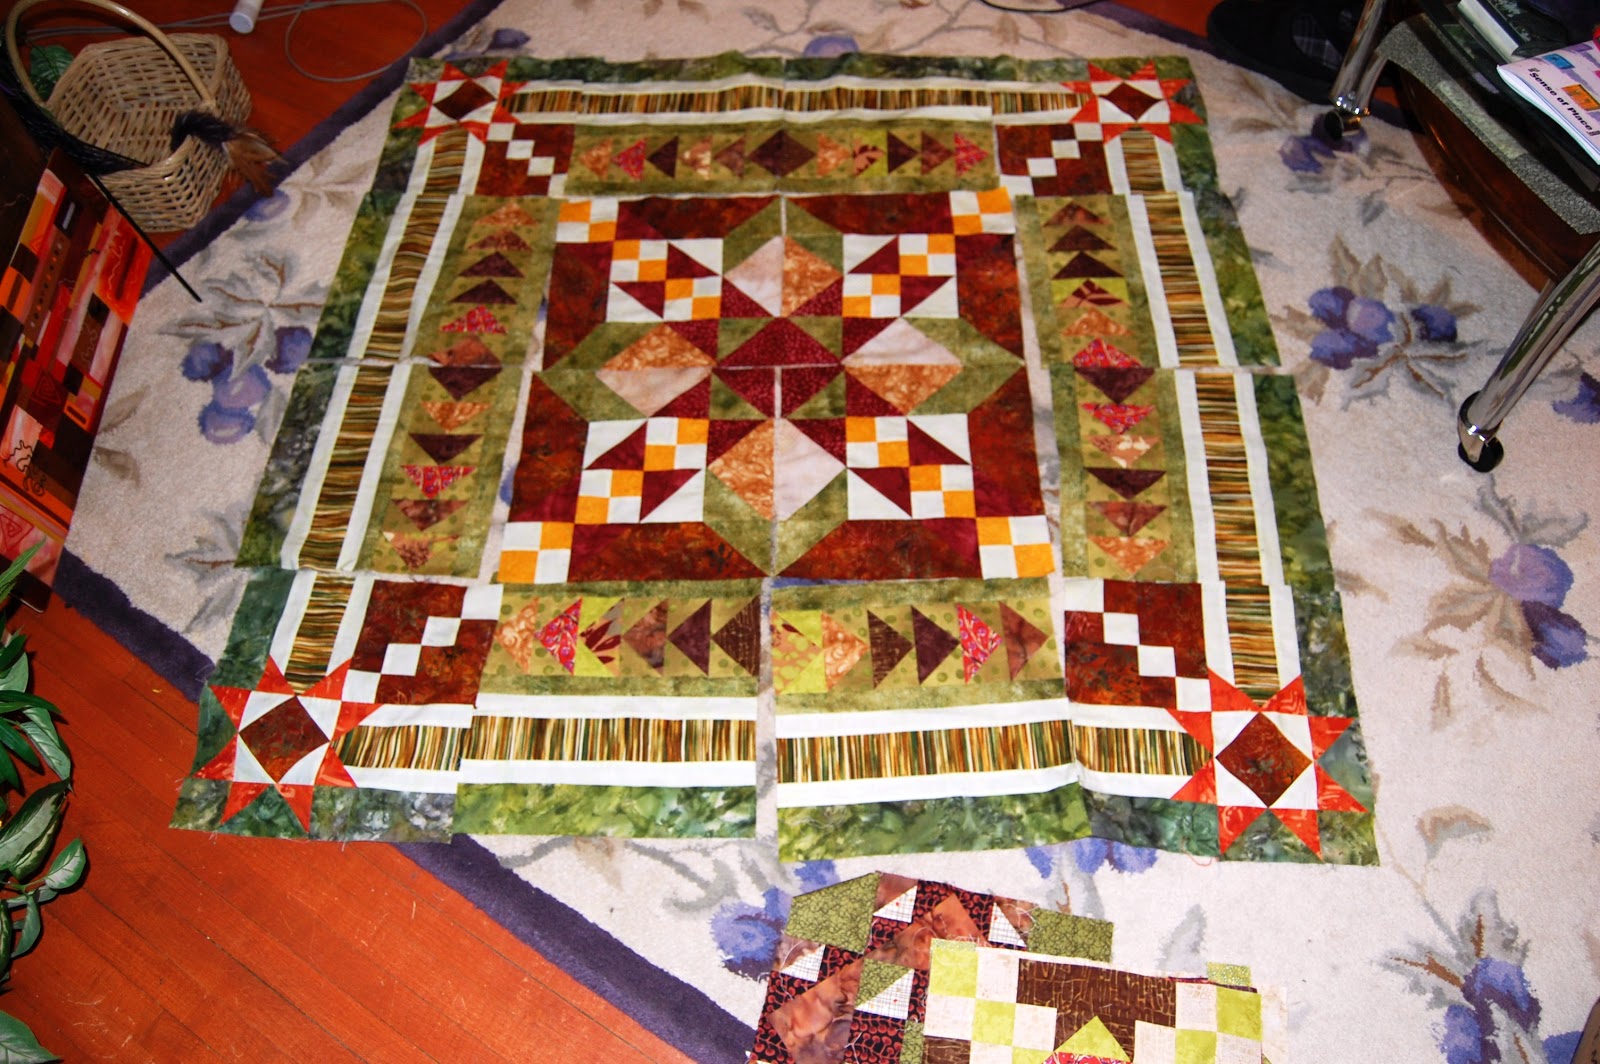
Meanwhile, here is the center laid out on my living room floor. 

Glass

I’ve been putting a little more time into glass work than fabric lately.  I have a few classes scheduled, and a long list of ideas.

My original plan with glass was to purchase a kiln of my own sometime early in 2013.  I do not think that is going to happen now.  I still have way too much to learn about the actual operation of the kiln.  Additionally, I really enjoy my time at the studio and I think it’s a good learning atmosphere as well as being a good social activity.

I passed on this glass fever to some other people! 

The small contracting firm that I work for (but not at; I work at a client location) is virtual.  We have no offices.  Every few months, we get together.  Some of those get togethers are business related, but a few are social.  I convinced the management to hold one of the social get togethers at my favorite studio (The Studio at Rush Creek).  We had 18 people, made 12 inch plates, and a good time was had by all. 

A few people from that night are going to return to the studio.  A couple are interested in classes and I believe one person is going to have a children’s party there.  It feels really good to both spread my hobby and to gain business for a woman who’s taught me a lot! 

I will admit, however, to some jealousy at the creations made that night!

Using up Stock, aka Experimenting

When I first started doing studio time with glass, I was instructed by that mentor to buy COE 90 glass.  (COE = Coefficient of Expansion, and you can NOT mix COEs).  Her studio was a 90 studio.

Since then, I’ve decided that I much prefer another studio, and that most studios open to the public use 96 COE.  I’ve also found 96 to be a bit cheaper.  90 has some really cool specialty glass, but I can buy just those and make special projects (It’s expensive for the really nice glass – too expensive to have a “stash” of it).

I’ve made the decision that my stash is going to be 96 and that’s all I’ve been buying lately (except for the rare specialty piece).  However, since I initially bought quite a bit of 90 – have to have a good palette! – I have some to use up.  My goal over the next few studio sessions to make pieces exclusively with the 90 in order to reduce what I have of it.  While I’d like to have options, it can be disastrous (cracking, etc) to mix COEs in the kiln and I want to reduce the chances of doing that accidentally.

To this end, I decided that I’m going to “play” with the 90; make weird pieces, try odd things, etc, just to see what things will do.

I want this blog, and these pictures, to be a log of attempts and results.  I tend to forget what I did, and look at the finished piece and wonder how I got there!

First – here’s the loaded kiln:


Piece One

Nothing too experimental here.  This is one of my “My Style” pieces.  It’s about 8x10.  All the pieces – including those cut from rods – are 90 COE.  It’s the standard two layers of glass, with some areas have little pieces on top to make a third and a fourth layer.  I don’t expect any real surprises here.


Piece Two

This piece is about six inches square.  The bottom of this is a THIN layer of medium blue transparent glass.  It’s thinner than most I’m used to working with.  Also, there is NOT a second full layer.  Glass wants to be ¼ inch thick.  What I expect to happen to the bottom piece is that it will shrink where there isn’t anything on top of it.  It should turn out with scalloped edges.

There are white solid squares on top, then light blue transparent squares on top of those.  Since the blue is light, and transparent, I expect it will lighten considerably.

Lastly, the circles on top are pieces cut from a millifiore rod.  They are actually a 104 COE.  In the past, when I’ve used 104 COE millifiore pieces on other COEs – there’s been some light cracking around the edges.  (Note:  104 is soft, 90 is the hardest of the COEs used in fusing).  However, I’ve noticed the cracking when the millifiori is large (approaching ½ inch) or many are laid out next to each other.  These pieces are quite small (about 5/16th inch) and laid out singly.  I am also interested to see what they do against the transparent background.  And a final thing to observe – does the very thin bottom layer, and lack of other solid layers affect the melting/cracking potential?


Piece Three

This piece is about seven inches square.  This is another attempt to play with single layers.  The bottom layer is a transparent green that is also thin as in the above piece.  I’m hoping for scallops along the sides, but not the top or bottom.

The next layer is a solid purple, and then a solid white, about 1/8th of an inch (maybe 3/16th) white laid on the top.  Those were DIFFICULT to cut out!


Piece Four

I then moved on to smaller pieces and using some thin copper foil I have.  This piece is about 3 x 4 inches.

I found the following on a website about fusing:

During the process of firing, copper oxidizes. The areas that oxidize the most turn turquoise, the areas with less oxidation turn red. The oxidation occurs in the kiln in the hours before the glass begins to fuse. Once the edges of the glass have fused, the oxidation process stops.

So, I’m very interested to see what happens with the copper and the different colors of glass

In this piece, I put copper lines on a piece of solid bright green and covered it with clear glass.


Piece Five

This piece is copper hearts (they weren’t the easiest to cut out!).  The piece is shy of one inch wide – which should give you an idea of how small the hearts are.  I first attempted to use scrapbooking paper punch to cut them out, but the metal is too strong for that, even though it is thin.

I overlapped the white with the clear by a good margin.

I’ll admit… this was done out of laziness.  I’m just experimenting, so I didn’t want to spend a lot of time cutting….

However, after reading that passage about the oxidation stopping when the glass fuses, it will be very interesting to see if the overlap affects that time


Piece Six

This piece is also shy an inch wide.  It’s going to be very interesting to see both shrinkage and oxidation on this.  The fancy green solid glass is much wider than the clear on top.  There is nearly ¼ inch exposed on both sides.  The clear also does NOT completely cover all the copper.  I wonder what will happen to the exposed edges?


Piece Seven

This piece again does the top (clear) overlapping the bottom (white).  The cutout star takes much more of the surface than the hearts mentioned above.  I think this should affect oxidation.

Small bit of advice – while most people can eyeball and cold cut a heart – don’t try it with a star!  I just couldn’t figure it out.  I finally turned the copper over and drew and star with a sharpie.  When I was drawing it, it was so automatic and simple!  Yet, that doesn’t translate to cutting…..


Piece Eight

Yet another overlapping clear over white with copper bits in-between.  However, on this one, I put a piece of fiber paper (fiber paper does NOT burn up in the kiln) in between to make a channel.  I wonder how that space will affect the oxidation?


Piece Nine

Done with the copper.  Now I’m just playing with some scraps.  Piece of transparent green on the bottom, piece of white over it, and then a strip of green along the top.  I want to see what the under lap chunk on the bottom does AND what the strip does at the top and bottom where it has a lot of overlap.


Piece Ten

Green and purple – definitely my personal palette!  This piece is closer to ½ inch wide.  The bottom layer is a scrap of white.  The second layer is a piece of transparent clear.  The spots on top are a deep purple solid.  I’m quite interested in seeing how the colors.

I’ve also put fiber paper into this one to make a channel. 


Finished Pieces

Inspiration is a funny thing.  Two weeks ago, I put some pieces into the kiln.  I only took pictures of the two plates.  The interesting thing about both these plates is that there is a great lack of originality combined with some of my special techniques.  I’ll explain more with each description.

When I went into the studio two weeks ago, I was feeling a bit lack luster.  I’d just seen all the plates that my firm had done at their social outing and I was jealous of some.  I also had a lot of noise in my head from those… too many designs, techniques, etc. 

Bit of background.  I am notorious for sorting.  Things MUST be organized.  So, to clear myself, I pulled in all my glass from my mobile studio (aka the trunk of my car).  I sorted, organized, played with, and came to the conclusion that I had too many pieces of some colors and that became my starting point.

Additionally, when my firm did their outing, I wound up with all the scraps of glass.  Most of the people there weren’t going to do glass again, AND even if they did, they weren’t going to store a stash like me, so it only made sense I got the scraps of the paid for sheets.  Many of these pieces were cut from for other projects.

Note:  both plates are 12 inches, slumped to the “square in square” design.

Plate One

Black scraps are threatening to overwhelm my stash.  I had a lot from my own projects, and then a couple people did plates using black bits, so I wound up with an over full container of small black pieces, in addition to larger pieces. 

I did the technique of laying down powder and the cutting “mosaic” pieces from scraps and arranging them to make the second layer.  I used both black and clear pieces, with a couple black iridescent scattered in.  They are framed by red strips, which are decorated with other black pieces.  The fusing is not a completely full fuse; there is a little bit of nubby texture on the pieces.


Plate Two

One of the team mates at the outing made a plate with strips of reds and browns.  I took her leftovers, combined them with a few other colors and viola!  Total artistic stealing…. But I like it.  It will make a good present for someone……


Teaser

I have a bunch of new beads.  I’m getting better!

However, I’m tired and it’s late….

Tomorrow….

Saturday, November 3, 2012

Quilts Are To Be Used!

Since it is already established that I’m a Crazy Cat Lady…. We’ll start with the obligatory cat picture.


And, while on the subject of just plain crazy… and interpret any part of this story as who/what is crazy about it… J

My daughter Ana’s birthday in a few days and I’ve been gathering up some presents for her.  She gets nothing big; we bought her tires for her car which is supposed to be a combination birthday/Christmas present…

But…

I’m her mom… she’s my lovely daughter… so things will be bought!

She’s a Packer Fan.  (That’s football by the way, if you are like me and really have no clue about sports). 

I’m also an EBay fanatic… you can find some odd, odd things out there….

Very odd…

Like these:


Yes, silk panties with the Green Bay Packer logo all over them. 

Not Just for Display

What is a quilt?  What is its purpose?

Not an easy question, and I get very upset with the low opinions that many people have about quilts now days.  The quilts that I make are not cheap, cheesy or poor quality.  I am not “crafty”, my things are not “home-made”; rather, I create handmade art.  I think that myself – and ALL the other people out there who work with fabric – deserve to have our pieces compared to museum art rather than bedspreads sold in bedding packs at Mega Mart (made up name – but you know what I mean).

Someone once asked me what I’d sell a particular quilt for.  I quote them a LOW price compared to the price of materials and the amount of work that I put into it.  Their response?  “oh, I could buy a quilt AND sheets at <retailer> for a fraction of that!”.  Other quilters have reported that people think their prices should be lower because “you love to do this”.

Really?  REALLY?!?!

This is serious art work people! 

That said – In my opinion, quilts are also a useable commodity.  One of my current compliments from my daughter Ana is that she wore out a quilt that I made for her!  I’m not upset in any way that it’s come to the end of its useful life; quite the contrary – I’m thrilled that it’s been so appreciated!!!

I have made MANY quilts over the last two years, and many of them do sit in piles around the house… I just can’t use that many, I’ve given away over a hundred pieces, and everyone I know has a quilt!  I love making them!

But, here’s some proof that I do use them…

Here’s my room currently.  The quilt that you see is one that I made purposely for myself a few months back.  The “focus” fabric on it as a batik that I bought at a Nancy’s Notions event two years ago.  It’s in many places on here.  Look at the block that at the right side, top (above a pillow) that has an outer row of bright green.  Now look at the block right below it.  The left side of that block is two squares and the right side is a single fabric – that is the focus fabric.  Now, look at the block in the bottom middle.  To the left of it is a block that is mostly purples.  The outside row of the block is the focus fabric.  You’ll also notice it in other places.


I took that fabric, and a variety of purple, green, beige and other complementary batiks and made what I call the “square in square” block.  There was no real plan.  I made large blocks, and ¼ sized blocks, and just put them together to make the larger blocks.  I used a few pieces – including a whole large square – of the focus fabric to fill in and completed.  I used up a lot of scraps of batiks AND created a king sized quilt that is serving me nicely right now as the weather gets colder. 

You cannot see – but there are two other quilts beneath this one.  This one is the largest, and makes a nice coverall.

Moving on, here is a picture of what we call the “East Room” or the upstairs living room.  It’s a 101 year old house, quite large, and there are currently only two of us living in the house.  We put a nice computer and TV/Monitor into the room, converted the daybed from a bed back into a couch, and when it’s cold, we hang out there instead of heating the rest of the house to comfort level.

Here’s the quilt that’s currently on the daybed/couch.


And look back at the obligatory cat picture – notice that they are cuddled up on the quilts on my bed? 

New Quilt Stuff

The Jo’s Little Women Quilt Group (Mini quilts) is still meeting and I worked hard to get the latest project (top) done the weekend before the last meeting.

Only to get a phone call the day before the meeting reminding me that it was postponed due to the teacher being at Quilt Market!

Arrgh!!!

I was actually prepared….

*sigh*

Here is the quilt top that I worked to finish.  I used bits and pieces from my recent projects to make the checkerboard strips (actually a bunch of four patches laid end to end).  The other fabrics are from small stash pieces in my “Jo’s Box”.  The four patches finish to 2 inches to give you perspective.


True to form – here is an even more mini quilt with some of the scraps from the scraps used!  I haven’t decided yet if I’m going to put another border, or just finish it for a Barbie/other doll sized piece.

Scrap Tamers

My favorite group started up again and I’m once again working on the Mystery for it.  Two of my friends are also in the group.  I have no pictures to post yet, but I am caught up on fabric cutting for the project, and am not yet behind on the piecing (due in 2 weeks!)