This is going to be a short post (for me). I am currently working on a cool quilt and
want to take some pictures of the blocks before I start talking about it
here. I’m making this a one “story” post
and a teaser or two!
Legend:
(I’m trying to advertise my blog, so I’m going to put a “cast
of characters” type listing here for references)
- This blog as a whole: A sounding board for my love of fabric, fused glass, torch work, metal jewelry, bead stringing and anything else creative I can figure out how to do
- The Studio: The Studio at Rush Creek in Maple Grove, MN. A VERY nice place to take classes, attend studio time and use tools you don’t have at home and even for a nice cup of coffee
- Karen: The owner of the Studio
- Mary: Me, the self proclaimed artist with a wonderful and very patient husband and five cats who think all fabric is their bed and all jewelry bits are toys
I’m a Copy Cat
A week ago, I found this on Pinterest:
I have a lot of millefiore and thought I would give it a try….
In usual Mary methods – the first try is the best, and the
second and third and not as good…. Here
are the pictures, in order… Then I will tell you what is wrong.
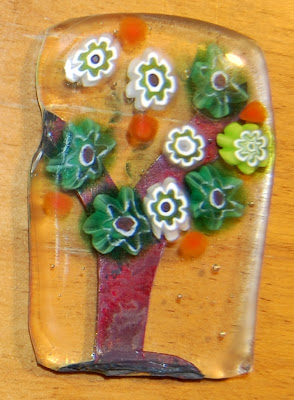
I used copper foil for the base and trunk of the tree. In trying to cut down the size of the tree, I
let the copper foil slip out from between the glass and it did nasty
things. I’m going to try and “fix” the
two of them by re-kilning them with a little bit of glass.
Also, in the second one - the orange dots started out as pieces cut from a RED stringer. Kilns do odd things to glass and red behaves especially eratically....
What did work well was my assembly method. In the original Pinterest item that I copied,
they used glass (or maybe paint) for the tree trunk/base. I did not have any brown COE 104 glass, so I
used the copper. Metal MUST be totally
surrounded by glass when put into the kiln – otherwise it “burns” as shown in
the above pictures.
I laid down my base layer, put the tree trunk of copper on
it, covered it with clear glass, and THEN put on the millefiore over the
top. One reason for this was that the
millefiore would be lumps between the two sheets of glass and would most likely
cause a lot of bubbles to appear. I like
bubbles, but they have their place to be and this is not it. The other reason was the effect that I got –
that I was hoping for – of a dimensional effect. It shows pretty well in this picture.
- (Fact – 104 COE millefiore is far more prolific than other COEs. The millefiore I’m using here is indeed that, and the nicest ones are all bought through murano millefiore online)
- (Fact – the sheet glass that is used for fusing projects is almost always either 96 or 90 COE and you cannot mix COEs)
- (Ergo, conclusion – I have to buy special sheet glass to make things with the millefiore)
I like the white background better, so I am going to
order some more of the 104 glass white.
Karen at the Studio has also suggested that small trees (pendant sized) (note,
the white one is about 3 x 5), might be a good selling item. Therefore, I have also ordered smaller
millefiore. The ones I have been using
are 8-10mm. I am looking at using ones
that are 3-4mm instead. Also, the tree
trunks are cut from copper foil. I have
used two thicknesses of copper foil. The
one I bought is like a heavy aluminum foil, and the one Karen has at the studio
is much thicker, but still flexible. That
is the one I used for these – it is really not flexible enough for fine
detail/narrow pieces. I have also
discovered that the thinner stuff is too easily destroyed. It is good for paper punches, but not much
longer/bigger.
Brainstorming occurred….
I bought some copper “wire” a few weeks back to play with –
the spool says “copper strip.” It is
like ribbon rather than wire. It is
quite thin, but is .125 inches wide. I
cut a piece of it and then cut it up the center. Here’s the result laid out on a card stock.
Facts:
- The purple card is a business card blank
- The drawn on circles on the left are about 6-7mm and those on the right are about 4mm.
Teaser
This was the inspiration for my new quilt….
But….
Mine is going to be very different…. And very similar…..
Teaser 2
I have bought a bunch of cabochons, gemstones, and large
beads as of late and will be wire wrapping soon I also have some ideas how to
incorporate the copper strip in some….
This week’s special – 30% off on anything on my etsy site
for current military or veterans!


