Saturday, June 1, 2013

Trees!

This is going to be a short post (for me).  I am currently working on a cool quilt and want to take some pictures of the blocks before I start talking about it here.  I’m making this a one “story” post and a teaser or two!

Legend:
(I’m trying to advertise my blog, so I’m going to put a “cast of characters” type listing here for references)

  • This blog as a whole:  A sounding board for my love of fabric, fused glass, torch work, metal jewelry, bead stringing and anything else creative I can figure out how to do 
  • The Studio:  The Studio at Rush Creek in Maple Grove, MN.  A VERY nice place to take classes, attend studio time and use tools you don’t have at home and even for a nice cup of coffee
  • Karen:  The owner of the Studio
  • Mary:  Me, the self proclaimed artist with a wonderful and very patient husband and five cats who think all fabric is their bed and all jewelry bits are toys

I’m a Copy Cat

A week ago, I found this on Pinterest:


I have a lot of millefiore and thought I would give it a try….

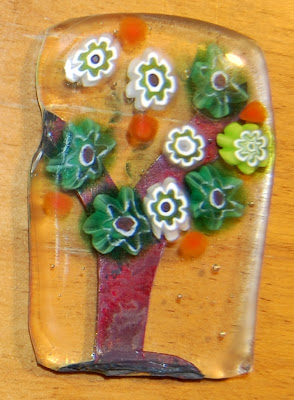
In usual Mary methods – the first try is the best, and the second and third and not as good….  Here are the pictures, in order… Then I will tell you what is wrong.


I got sloppy…

I used copper foil for the base and trunk of the tree.  In trying to cut down the size of the tree, I let the copper foil slip out from between the glass and it did nasty things.  I’m going to try and “fix” the two of them by re-kilning them with a little bit of glass.

Also, in the second one - the orange dots started out as pieces cut from a RED stringer.  Kilns do odd things to glass and red behaves especially eratically....

What did work well was my assembly method.  In the original Pinterest item that I copied, they used glass (or maybe paint) for the tree trunk/base.  I did not have any brown COE 104 glass, so I used the copper.  Metal MUST be totally surrounded by glass when put into the kiln – otherwise it “burns” as shown in the above pictures.

I laid down my base layer, put the tree trunk of copper on it, covered it with clear glass, and THEN put on the millefiore over the top.  One reason for this was that the millefiore would be lumps between the two sheets of glass and would most likely cause a lot of bubbles to appear.  I like bubbles, but they have their place to be and this is not it.  The other reason was the effect that I got – that I was hoping for – of a dimensional effect.  It shows pretty well in this picture.


  • (Fact – 104 COE millefiore is far more prolific than other COEs.  The millefiore I’m using here is indeed that, and the nicest ones are all bought through murano millefiore online)
  • (Fact – the sheet glass that is used for fusing projects is almost always either 96 or 90 COE and you cannot mix COEs)
  • (Ergo, conclusion – I have to buy special sheet glass to make things with the millefiore)
I like the white background better, so I am going to order some more of the 104 glass white.  Karen at the Studio has also suggested that small trees (pendant sized) (note, the white one is about 3 x 5), might be a good selling item.  Therefore, I have also ordered smaller millefiore.  The ones I have been using are 8-10mm.  I am looking at using ones that are 3-4mm instead.  Also, the tree trunks are cut from copper foil.  I have used two thicknesses of copper foil.  The one I bought is like a heavy aluminum foil, and the one Karen has at the studio is much thicker, but still flexible.  That is the one I used for these – it is really not flexible enough for fine detail/narrow pieces.  I have also discovered that the thinner stuff is too easily destroyed.  It is good for paper punches, but not much longer/bigger.

Brainstorming occurred….

I bought some copper “wire” a few weeks back to play with – the spool says “copper strip.”  It is like ribbon rather than wire.  It is quite thin, but is .125 inches wide.  I cut a piece of it and then cut it up the center.  Here’s the result laid out on a card stock.


Facts: 
  • The purple card is a business card blank
  • The drawn on circles on the left are about 6-7mm and those on the right are about 4mm.
I think it will work!

Teaser


This was the inspiration for my new quilt….

But….

Mine is going to be very different…. And very similar…..

Teaser 2

I have bought a bunch of cabochons, gemstones, and large beads as of late and will be wire wrapping soon I also have some ideas how to incorporate the copper strip in some….

This week’s special – 30% off on anything on my etsy site for current military or veterans!

https://www.etsy.com/shop/FridayDesigns2012

Monday, May 27, 2013

Scraps Wrangled!

When one talks about quilting… many things come to mind….

Habits and idiosyncrasies about quilters are top of the list…. Especially for me since I know so many quilters.

Quilters are crazy cat ladies….

Really….

I see many comics, etc., with quilters and cats.

In my house, a piece of fabric on the floor – no matter how small – is something to be sat upon by a cat.  And since there’s five of them, not much fabric is missed by them.  My shelves of fabric in the basement just scream “cat bed” to each and every one of them….

Obligatory cat stories:

I laid out a small quilt yesterday.  Small enough that I could do it on my living room rug.  I cut away the extra batting, and left it lying while Chris and I went to dinner.  Sure enough – came home and it was already a cat bed!

I quilted the quilt after dinner and left it said quilt lying on the floor when I went to bed.  Ariel managed to disrupt it from laying flat on the floor, wiggle under it, and was waiting to jump out when Chris came down in the morning. 

And – not quilt related, but still a crazy cat lady story….

We took Bronx to the vet today.  For those of you who do not know Bronx, he is a male Bengal with all four claws.  He was totally unsocialized when we got him that we had to lock him up alone and gradually introduce to the others.  He is also a F1 (First Generation) Bengal.  They are considered the “pit bulls” of cats.  There is a whole group out there that wants to ban private party ownership of F1s because they “will turn on you.”

Yea, right. 

Bronx is probably about 12.  We’ve had him 4 years.  He’s a HUGE baby.  He sits on Chris lap and nuzzles him.  He’s ok with new people, but VERY guarded.

We were a little worried about bringing him to the Vet.  He howled the whole way there.  However, he was VERY well behaved in the store/Vet (Petsmart/Banfield).  He did not attack any dogs.  He did not bite or claw the vet or the vet tech.  He did sit nicely for the exam.  He did not shred any paper in the exam room.  He even actually seemed to like shopping, sat nicely – albeit very attentively – in the cart.  He did not try to hop out and he did not try to chew open the treats or the dry cat food!


Quilting

I have been doing some quilting lately.... I even did some cleaning of my quilting area - that shows I'm serious!

Leave the Quilts Alone

In this post , I posted a picture of the quilt I laid out and made a comment about how it would look in the morning…..

Before:


After:


Yea, anything fabric is to play with….

And, while I am on the subject of this quilt.  At this point… I hate it….

Not really, just frustrated with it.  Very slow going and everything went wrong.

I subscribe to a monthly club for fabric packs.  It varies what size/shape I get each month.  I call it my “inspiration club.”  It makes me think about doing things outside my comfort zone.

I have made this pattern several times and I really like it….

However, this time, everything went horrible wrong.

The Pattern

I saw something similar in a quilt shop, but the directions are all mine.  I will write them up sometime, but here is a quick primer: 
  • Take squares of fabric and cute them diagonally both ways


  • Cut four strips of one fabric, and two squares of another for EACH cut up square of fabric.

  • Assemble to look like this

  • Trim
  • Assemble all blocks into a quilt

That’s really it.  It is a simple pattern, looks VERY complicated and it is absolutely wonderful for large squares of fabrics - layer cakes especially.  The cross bits are all one fabric, so they tie in the multiple patterns/colors of coordinating packs of fabrics.

I have made this quilt 4 or 5 times already….

The Saga

But this time….  Ugg

I cut out most of the strips of coordinating fabric and realized that they were too short….

I solved that by putting on corner triangles to make a nice look…

I trimmed the first few blocks and completed them, then realized that they were two different sizes in the corners…. I had to redo a few

Cutting the corners just didn’t go nicely

The fabric pack was greens, blacks and whites… some had two, some had three of the colors…. Putting together a pattern was not easy…. The squares were not easily dividable

Speaking of the squares, the person putting together the pack also had an issue with it.  There were all the squares that were supposed to be there, and then there was a shorted piece of fabric (same as another) in the center of the pack.

I laid the quilt out several times.  I would complete a few blocks, but it was time consuming working on the corners and doing some re trimming, so I would leave, the cats would destroy it, and then I would have to lay it out again, which would get me thinking all over again about what was “green”, “black” or “white”.

I finally assembled it, and decided it was going to get DONE.  I quilted it right away and went to do the border.  I had neither a green nor a black that would coordinate…. Not even a plain black!

I have THOUSANDS of yards of fabric and I did not have ONE that would work for the binding….

ARRRGHHH

Went to Joann’s today and got plain, black broadcloth… on sale for 40% off at least.

Twin City Quilting Block of the Month

In this post, I showed the picture of the completed Block of the Month for last year.  I also showed a picture of the quilt that I made from partial blocks, mismade pieces and other scraps….

And, in this post, I showed what I did with the LAST of all the scraps.

In between those – the large “left overs” quilt, and the final use of scraps, I also had a few more partial blocks and big enough scraps to make more so I made these two runners/toppers:


So, now, that project box is empty!  And nothing to put on my stash shelves…

*Happy Dance*

Textile Center Garage Sale

I went to the annual Textile Center garage sale.  I went the preview evening and paid my $25 for the pleasure of going through other people’s rejected items before the general masses… one person’s junk is another person’s treasure, right?

On top of the $25, I spent another couple hundred and got a TON of stuff…. Ok, a quilter’s ton, not a measurable ton…

 I bought some yardage, but mostly bought smaller bags of fabrics.  I did buy a couple of the “expensive” packs.  One person had donated a bunch of fabrics that I recognize to be Australian and had them neatly organized into bags.  There were about 5 times what I would call “garage sale” pricing, but still less than the store – probably half to a third what I paid in Australia for some similar, and definitely not available here or common.  I bought some beads as well.  I got some neat pieces, and sorted them into my collection.  Nothing earmarked for a projects

The Seven-Dollar Quilt

Amongst other packs of fabric that I bought, I bought a zip lock of 2-inch squares.  I think it was $1. 

Not the best buy…. Pricy for the few squares it was… someone else’s choices, cutting, etc.  Basically a bag of scraps…

Bag of Inspiration!

I started sewing the squares together.  I formulated my plan as I went, and even then, did not know until the very end what it would be.

I also bought three bags of beiges.  Larger scraps… some long, some wide, some about the size of fat quarters, a couple pieces close to a yard.  All different patterns, but all around the same color… beige, tan, ecru, sand…

How many other names can you come up with for basic beige color?

Here is the end result!


I am going to call it “City Scape”.   Can you see the city in it?

Also, look at the one corner…   There’s a reason for it.   

Basically, I made blocks that looked like this:


And assembled them into rows like this:


Notice the “Built in border” on the two sides?

I added border to the other two sides:


And used a four-patch in the very corner!

And, of course, I had a couple pieces left over…..


Scrap Tamers

I also finished the top for the Scrap Tamers mystery quilt.  Remember, I ONLY used scraps on this!


Glass

I have not been to the studio lately.  I missed three Fridays because of:  The Studio closed for a special event, mini retreat for my quilt group and last weekend’s Wisconsin Dells trip (in that order).  So, I got there as soon as I could this past Friday… I made a couple small pieces, then I set off to work with my 104 COE glass (millefiore, canes… etc.) and made this special display piece for myself:


The main idea behind this was to showcase some of the smaller bits of glass that I work with.  I am going to try another one, but after I get to the torch work studio and make some stringers and other things that I can work into the design.

It has got some geometric designs, but I also branched out (no pun intended) and made a couple stylized designs:

A flower:


The leaves are trimmed from glass sheet, the flower is millefiore, and the stem is actually copper.  It will be interesting to see how it color changes in the kiln.

An apple tree:


The tree trunk/branches are also copper like the stem in the flower.  The leaves, apples, etc., are millefiore.  I cannot take all the credit for this – I copied something from Pinterest!

Using Plates

No, this isn’t a quip about my barbarian family learning to use utensils for the first time or something…. They are generally quite polite (we won’t mention burping… on the part of several of them!)

Anyway, we are beginning to use my fused glass plates for regular dinner service in the house.

This is Chris’s masterpiece of dinner tonight… meatballs balanced on the opposite corners… basil leaf illustrating the food….


And on that note - good night! 

Sunday, May 12, 2013

Cats Rule


I must really learn to accept the fact that the cats in this house are ultimately those completely in charge.

They empathize this to me in many, many ways each day.

Especially where fabric and quilting is concerned.

I gave my BFF’s daughter, Anna, a quilt for graduation.  I’ve written about it here before.  I gave it to her over a month ago – two or three I think – and at that time, I ran it through the dryer to remove cat hair, bagged it nicely in a gift bag, and kept it out of the reach of the cats.  She brought it to the church basement for a quilting day and is STILL picking cat hair off of it.

I got home from the quilting day today and set some of my stuff down in the front entryway.  My return home was approved....  


This is, of course, in addition to the cat that is curled up in the batting scraps box right now…

Boxes are a natural cat trap, add in some fabric and it’s completely irresistible to them!

“You made these nice soft beds in boxes for us right?”

*Sigh*

There’s also the fact that any fabric on the floor is fair game to them…..

This is the current situation with a quilt I’m working on:


I’m curious to see what it looks like in the morning.  Anyone care to take bets on how many blocks are out of place when I get up and/or the farthest location of a block from its original position?  I bet one is under the couch and I need to search.

Quilting
This weekend was a “Mini Retreat” for my quilt group.  We sewed in the church basement from 4 pm until late on Friday, and then returned on Saturday and sewed for the whole day.  We went home to our own beds in between.  It’s usually a small, core group of people and I really enjoy the camaraderie.  It also gave me no excuse to turn from glass for a while and finish some projects.

Yes, Nancy, quilting/fabric is my true, first love and always will be.

Scraping

I’ve mentioned many times before about “Scrap Tamers”.  This is a monthly program that I do.  Each year, the group does a “mystery” quilt, and there’s also a new pattern/technique each month.  The goal of the mystery quilt – and the program as a whole – is to utilize scraps from your stash to put together a project. 

I take the spirit of it to heart and always complete my mystery!  Last year, I even did two simultaneously (ok, I’ll admit, I read the cutting instructions wrong and wound up with two sets of pieces (step one was cutting everything)).

This year, the mystery called for lights and darks of the same color and a focus fabric.  I picked out a focus fabric, put it on the table, and then cut all the lights and darks in the complementary color (blue).  As soon as I was done with the cutting, I picked up the focus fabric, put it back into stash, and cut up a totally different fabric!  I’m really quite fluid in my fabric selections for projects….

The last month’s “clue” for the mystery completed all the blocks and this month’s clue gave us the layout for the blocks.  Here is my assembled quilt top:

Other Projects
Keeping in the spirit of scrap taming, I only worked on scrap projects this weekend.

Last of the TCQ BOM
I did a block of the month project from Twin City Quilting.  I’ve posted pictures of the finished quilt in this blog before in this post.   The second quilt in the post is actually made from all the scraps from that project.  Today, I used the last of the scraps into a lap/crib quilt.  The pattern was inspired by a “Sea Glass” quilt that one of my companions showed up last night. 


There are a couple small (table topper) pieces also from the scraps of this project (it was all nice batiks and fine quality patterned fabrics – I had to use them all!).  I may eventually post those pictures.  However, this quilt was really quite fun to do and I’m pleasantly surprised at how “planned” and polished it looks.  Here’s the basic “pattern”.

  • Trim all your fabrics to use to a common width.  Pieces that are over, but close, just leave – you’ll trim them later.  I used three inches.  Set aside pieces that are 1-3 inches in width and cut the larger pieces into strips.  Cut pieces of various widths from the strips.  I like to keep them at least 1 inch wide, and now wider than 2 ½ inches.  I did use 3-inch wide pieces, but only those that were already that width when I sorted the scraps; I didn’t want to have two smaller pieces. 
  • Sew all the scraps together into a strip (or strips) along the 3 inch (or whatever length you used) side.  I created one LONG strip, and then cut it into smaller strips when I determined how much I had/how many rows I was going to make.  When all the pieces are sewn into a strip/strips, trim them first to length, then trip to width.  I had 6 lengths of 40 inches.  Each looked basically like this:


  • Next, I sashed/bordered the quilt with two fabrics and assembled.  I used a thin, dark strip, and a wider light strip. 


  • Then, put a strip of the dark fabric on each end

  
  • Finish with a larger border of the light sashing fabric.


The beauty of this pattern is that you can size it to just about any size, use a few or many scraps, and have a unique piece!

Garage Sale
A couple weeks ago, I went to the annual Textile Center Garage Sale.  This event is the largest fundraiser of the year for the Center.  They collect all sorts of crafting materials – beads, thread, yarn, fabric, etc. – and have a two-day selling event at a local warehouse.  Friday night, you can pay $25.00 for the preview sale, Saturday 10-2 or so is the regular sale, and then the bag sale is at 3. 

I like to go to the preview sale, but don’t always make it.  Last year, I did the regular sale, then went back to the bag sale.  This year, I did manage to make it to the preview, but wasn’t able to go back on Saturday.

I was intrigued by a bag of 2-inch fabric squares.  I don’t normally buy pre-cuts that small, but the bag was $1, and something about the mix of colors/fabrics got my attention.  I combined it with fabrics from two collections of beige/cream pieces.  The fabrics had some similarity between the bags so I assume they were the same donator.  Also, I think each bag was $2 or $3.  Here’s the quilt:


Now, let me tell you about the creative process!

I started sewing with no pattern in mind…. Just starting sewing 2 inch squares to each other….

Brave, aren’t I?

My first semi-solidified plan was to sew the squares into 25 patches or so, combine them, and make a table topper/runner out of just the 2-inch squares.  After getting about half way through the first step (sewing two squares together), I decided that while there were a lot of squares, there really wasn’t going to be that much surface area when they were all sewn together.  Also, I thought that the essence of the colors/fabrics that attracted me would be lost if they were all crowded together.

Four patches were created instead.  Then, each four patch (3½ inches) was sewn to a square of beige it’s same size, then squared off with a rectangle the size of the rectangle just created.  Basically, I wound up with blocks where the color was only ¼ of the block and in a corner.  I then arranged those blocks into rows.  The number of blocks drove the number of rows.  I bordered the blocks on two sides only; mostly just to make all the colored pieces interior. 

All of them except for the very corner… look for it…. I think it’s a cool little touch

This whole quilt makes me think of an urban landscape – buildings if you will…..

And there were two colored four patches and a few beige pieces left over when I was done, so I put together a little table topper:


Jewelry and Glass
A few little quips about the other hobbies in my life….

(yes, fabric is my first love, but I have to mention a few other things!)

Etsy!
I have an Etsy store!

Finally…..

I’m still working on getting everything up there, but here it is:  Friday Designs

It’s that Small?
Insert any bad joke you want here…

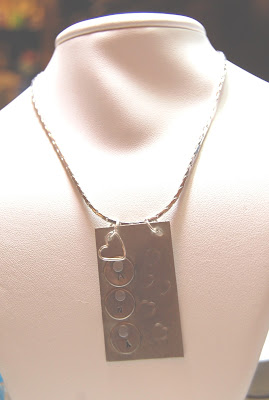
I’ve taken a couple metal working classes lately.  In the latest one – “Cold Connections” – I learned how to rivet two pieces of metal together.  I cut out discs, stamped letters, and riveted, coming up with this for Ana:


I was talking about it to her on IM late one night, sent her a picture and then I told her the dimensions.

She was floored….

She had thought that it was much larger than it was….

She told me that she was truly impressed with the detail in it!

The pendant is about 1 inch x 1¾ inches.  Those circles with letters are about 3/8 inch if I remember correctly.

Sunday, May 5, 2013

Fire!


So, while working with glass and a torch on Thursday, I set the chair on fire…

Really, I did!

But, it is actually a good thing.

The MOST important lesson that I have learned with working with glass – all glass, fused, torch work, etc – is do NOT attempt to catch anything falling….

Glass is sharp and cuts.  Hot glass is VERY hot and burns quickly and painfully.

Let the items fall.  Then figure out how to pick them up.

On Thursday, I went to “open torch” at Potek glass.  This is an open studio session in which I use the torches to either make beads with soft glass or paperweights and other things with hard glass.  Either way, it involves melting glass rods with a 2500-degree torch and reforming them.  Often times, you attach a “punti” – a slender rod of glass - loosely to the side or end of your piece, finish working on it, and detach.  In order to avoid a lot of bumps, you attach it as minimally as you can.  Sometimes it does not hold well.

That’s what happened to me on Thursday.  The piece I was working on detached and fell towards me.  I jumped up quickly and the hot disc of glass fell on to the plastic chair that I was sitting on instead of on to my leg.  Plastic burns… some small flames occurred, but I got the piece picked up with a tool and finished it off.

Today, I also working on the torch and also lost a piece off a punti.  I let it roll away, and picked it up with a tool.  I did manage to burn myself at one point today, but it was not from trying it catch anything!

Quilting

I have not done much quilting lately, but I have a couple quick stories.

And do not worry, next weekend is a “mini – retreat” for my quilt group; I’ll catch up on some things then.

Baby Quilt

My coworker had a baby and the team approached me to make a quilt for them to give.  The deal I struck with them was that I would donate my time, and they would pay me for the materials.  I felt that that was fair and they agreed.

I totally forgot about taking a good picture of the quilt before I handed it over, but here’s one from during its production…. Once again, if I leave a quilt on the floor (laying it out), a chair (taking a break from binding), etc., it means that it is now Cat Territory.


Retreat demands

The big retreat – the one in which we actually go out of town and sleep away from our beds – is now in the registration period.  I do not have a checkbook (they do not take cards) and do not like filling out forms, mailing them in, etc…. It’s Chris’s job to sort mail and pay bills…. I do not have stamps, envelopes, etc… I do not like filling out forms (in case I did not mention that already).

Therefore, I tasked Ana with it.  I am taking her to retreat… I am paying her way (buying her company and affection!) – it’s only fair she work for it. 

I emailed her the form.  She cannot call or text me during work, but our email systems at work like each other and we do a lot of that.  As she was filling out forms, she started barraging me with emails… “What email address do you want on forms”, “do you want your birthday published?”, “Do we have any special needs (at retreat)?”

My answer to the last one went something like this: 
  • Turn down service at bedtime
  • Water bottles on demand
  • Masseuse, male, cute

There were a couple other things, but that was the gist of my amusement….

Ana’s email response…

“I’m so putting that all on the form”.

Glass
I am going to show a few pictures and then end this.

The latest round of beads:


And a close up of some…. Notice, I am getting better – some of them are same shape, size, etc!


Winner of the day – a gumdrop out of borosilicate glass


Runner up – the paperweight that Brandie says is the best.


The Hershey Kisses are not perfected yet


Some pendants and a piece to wire wrap (the one on the left, and, incidentally, it is also the piece that set the chair on fire)


And…. Some more paperweights!

They are round, they have designs… I’m getting better! 


Saturday, April 27, 2013

Quilts to Trade!


First order of business….

I have organized my quilt pictures to a degree….

An album has been created on my Photobucket site that ONLY has pictures of quilts that are completed, in my stash and that I am able to part with. 

For those who haven’t heard my complaints… I do not sell my quilts.  Generally, their value is not known to those outside the art/craft world and I have had way too many bad experiences with people who think that Wal-Mart bedding sets compare to a handmade quilt. 

“You should charge less because you like to do this”
“I can buy a full set of sheets and a comforter at Wal-Mart for 39.99”
“Fabric doesn't cost that much”
Etc.
Etc.

However…

I love to trade my quilts with people who appreciate them and have a similar product that is also undervalued.  Artists and craftspeople are my favorite barter partners.  I have put together the album so that I have a single link that I can present to potential trade partners.

The album is here.

Cold Connections Class

Trading quilts segues into me talking about the class that I took at the Studio at Rush Creek a couple days ago – “Stamped and Riveted Pendant.”

How does it relate?  I’ll get there…. Let me tell you about the class first.

What I want to talk about mostly are the people in the class.  This class was mostly women with a lot of experience in various art forms – jewelry/beads/etc.  I knew one from several classes and I think I recognized a couple others (I am so BAD with faces).  I was absolutely THRILLED to be treated as an artist by other people present!

First story:  Karen (not the studio owner) is someone who I took at class with AND also got tapped to give her a private lesson on the glass powder crackle technique (I think I mentioned that here).  She asked me about working with her on my “quilting on glass” technique!  She made the comment that her art is so undisciplined and mine is quite discipline; that she wants me to demonstrate how I do that. 

Let me try to explain why this thrilled me SOOOO much.  I have an inferiority complex about my art.  I cannot draw, I cannot copy still life to paper, I do not have a lot of what I call “unique ideas”.  I refer to Brandie as being far more an “organic” artist than I am, and I see that as true art.  I am geometric, I copy, I steal and adapt, I do the same thing over and over again – changing a few colors, positions, etc.  In some ways, I do not regard that as “art.”  Quilting and now fused glass – where I can make squares and be technical has been so enjoyable to me.

But, how does that translate to the rest of the world as art.

Well, given that my skills are admired and desired… obviously it does translate positively!!

Second Story:  The teacher of the class is an established artist; someone who I see in that “organic” world of art.  She teaches a lot, and sells pieces. 

First, let me tell you my “bad” actions…..

I’m enthusiastic… I am also “clueless” in a lot of communication/interaction things.

Social awkwardness and inability to read people/situations is a core of my being.  It is also something I am well aware of, working on in therapy and trying to adjust.  That awareness – I think – makes me a bit easier to take some days.  However, I know that I run roughshod over people, interrupt, and do not always function in my “place.”

I had been at the studio the week before this class and I had played with the stamps, flame treated copper, bronze AND nickel, and had copious amounts of little samples and test pieces that I brought to the class.  Several times, when people asked things like “what happens when you flame treat bronze”, I didn’t wait for the teacher to respond, but interrupted with “I’ll show you”.

Now, on one hand, it was a higher level class, and I was interacting and showing things that she did NOT have samples of herself, but on the other hand – I should have waited for more cues.  I was a little afraid that I offended her, but it did not show, and I think that the class ended with her having some positive feelings for me/my work.

I would like to think that artists recognize each other, and realize that personalities in the art world are unique and that socialism is different.  It’s not the highly defined and unspoken social rules that exist in the work place, high school, and other places with a larger contingent of “normal” people.

 After two hours of class, and me putting together a variety of things, Julie (the teacher) asked me if I did most of jewelry in metalwork!

Ummm….

I’m just learning and playing around!

I took the comment as a huge compliment!!

Here are some pictures of the things that I was working on.  Most of them are not yet finished; they need bails and/or dangling beads from the bottom holes.


And, as promised, and almost forgotten….!  How this all relates to my album of quilts available to trade.

One of the women in the class had on a gorgeous necklace.  It was large beads and each of those beads was made from hundreds – if not thousands – of tiny seed beads!

I went up to her, and examined it closely…

Which sounds a little odd… to go stare at someone’s neck…

But totally acceptable amongst artists!

I asked her if she was interested in a full/queen/king sized quilt as I would gladly trade her one for a necklace like that of my own!  I think she was impressed that I “got it”; that I recognized that a LARGE quilt with MANY hours of hard work and quality materials was the equivalent of that necklace. 

I’ve spoken here many times about people not appreciating the hours/materials/skill that go into our handcrafted  (NOT “Homemade” – that implies that cheesy, crafty, etc., look; our things are true art) pieces.  She also spoke about someone offering her $140 for a piece that took her over fourty hours.  And, yes, she had told the person how long it took before they offered that amount.

I get it… I get the effort that goes into art. 

So, I put all my tradable quilts into a single album that I can show people quickly!  Hopefully I can add some art of others to my collection at home soon.

Cleaning and Purging

One short story about the cycle of (craft) life, and then I am off to bed.  I have more to write, and quilt pictures to show – hopefully I write again tomorrow!

Something set me off, not completely sure what, but I organized several of my storage areas for craft/art supplies.  I also got the strength (yes, strength) to purge a lot of items that I would never use for various reasons, mostly that those things were more “crafting with the kids” items than things I would use in my current/future art.

The end result was that I had enough bags to fill the back of my car (not the trunk that is glass studio storage!).  I had foam sheets, plastic canvas, wired ribbon, envelopes of every shape, size, and color, two bags of pine cones, and entire paper ream box of plastic beads and much more.

I asked one of my teammates at work if her daughter’s school wanted the stuff.  Rather than school though, she stated that the after school program wanted any and all craft supplies they could get.  Today she pulled up next to my car in the work parking lot and I UNLOADED.

I think I surprised her with how much I had, and the quality.  (Although much was in bags, it was obvious from what was visible that there is good stuff there).

So, I feel good that I am passing on things and I have visions of happy little children playing with my purged supplies!