Sunday, July 17, 2011

Small bits and pieces

I am exhausted from a long week, and it’s already quite late; however, my daughter pushed me into this blog, and I feel guilty if I don’t do at least one post a week.  So, rather than something witty, or a long story, I’m going to cheat and do a show and tell this week.

There will be two subjects today:
1.        I’ve talked quite a few times about using my scraps.  I will show a few of the projects and details about them.  My goal is to show that everything can be used and provide some inspiration to others.
2.       Test pieces – Most of my quilts are planned and executed as a single piece.  However, when I create a piece for a challenge, I like to plan it out far more thoroughly.  Many times, I create a test piece that is either a smaller version, or a part of the planned piece. 

Using the Scraps

Piece One:  Green Scraps

If I have small pieces of fabric (smaller than a quarter yards) left over when I am and done piecing the top, I cut those pieces into standard sized squares and into 1 ½, 2, 2 ½, 3, etc., wide strips.  The strips get rolled up with same sized strips from other quilts according to color family.  Additionally, when I am done quilting a quilt and I trim the edges – the overage from the backing also gets cut up.

This large table topper / crib sized quilt/ large wall hanging piece is a result of my green and beige/tan/brown strips in a variety of sizes and some 3 inch squares of green.  These scraps are all from a variety of quilts.  The binding is also scraps from my color rolls.  This is what is called “scrappy binding”.


Piece Two:  Purple Scraps

This narrow table runner is also from a variety of quilts.  I took a pile of patterned purple scraps and made “quarter square triangles” with them.  Each square has triangles from four different fabrics.   I set those squares on point (diamond) and took solid purple scraps - some are left whole, other are cut in half - and used them to fill in the spaces.  The binging is a scrap, even though it is all the same fabric. 


Piece Three:  Strip pieces

Now we shift a little.  This small table running is made from leftover pieces from a large quilt.  In that quilt, I made “strip sets” of beige-lighter green-dark flowered green-lighter green-beige.  The strip set is 6 ½ inch wide.  In the larger quilt, I cut 6 ½ squares from the fabric strips.  This piece is made from the narrower left over bits.  I staggered them a little, trimmed the edges at an angle and put a border around it.  Ta Dah!  Looks planned, doesn’t it?


Piece Four:  Strip pieces deux

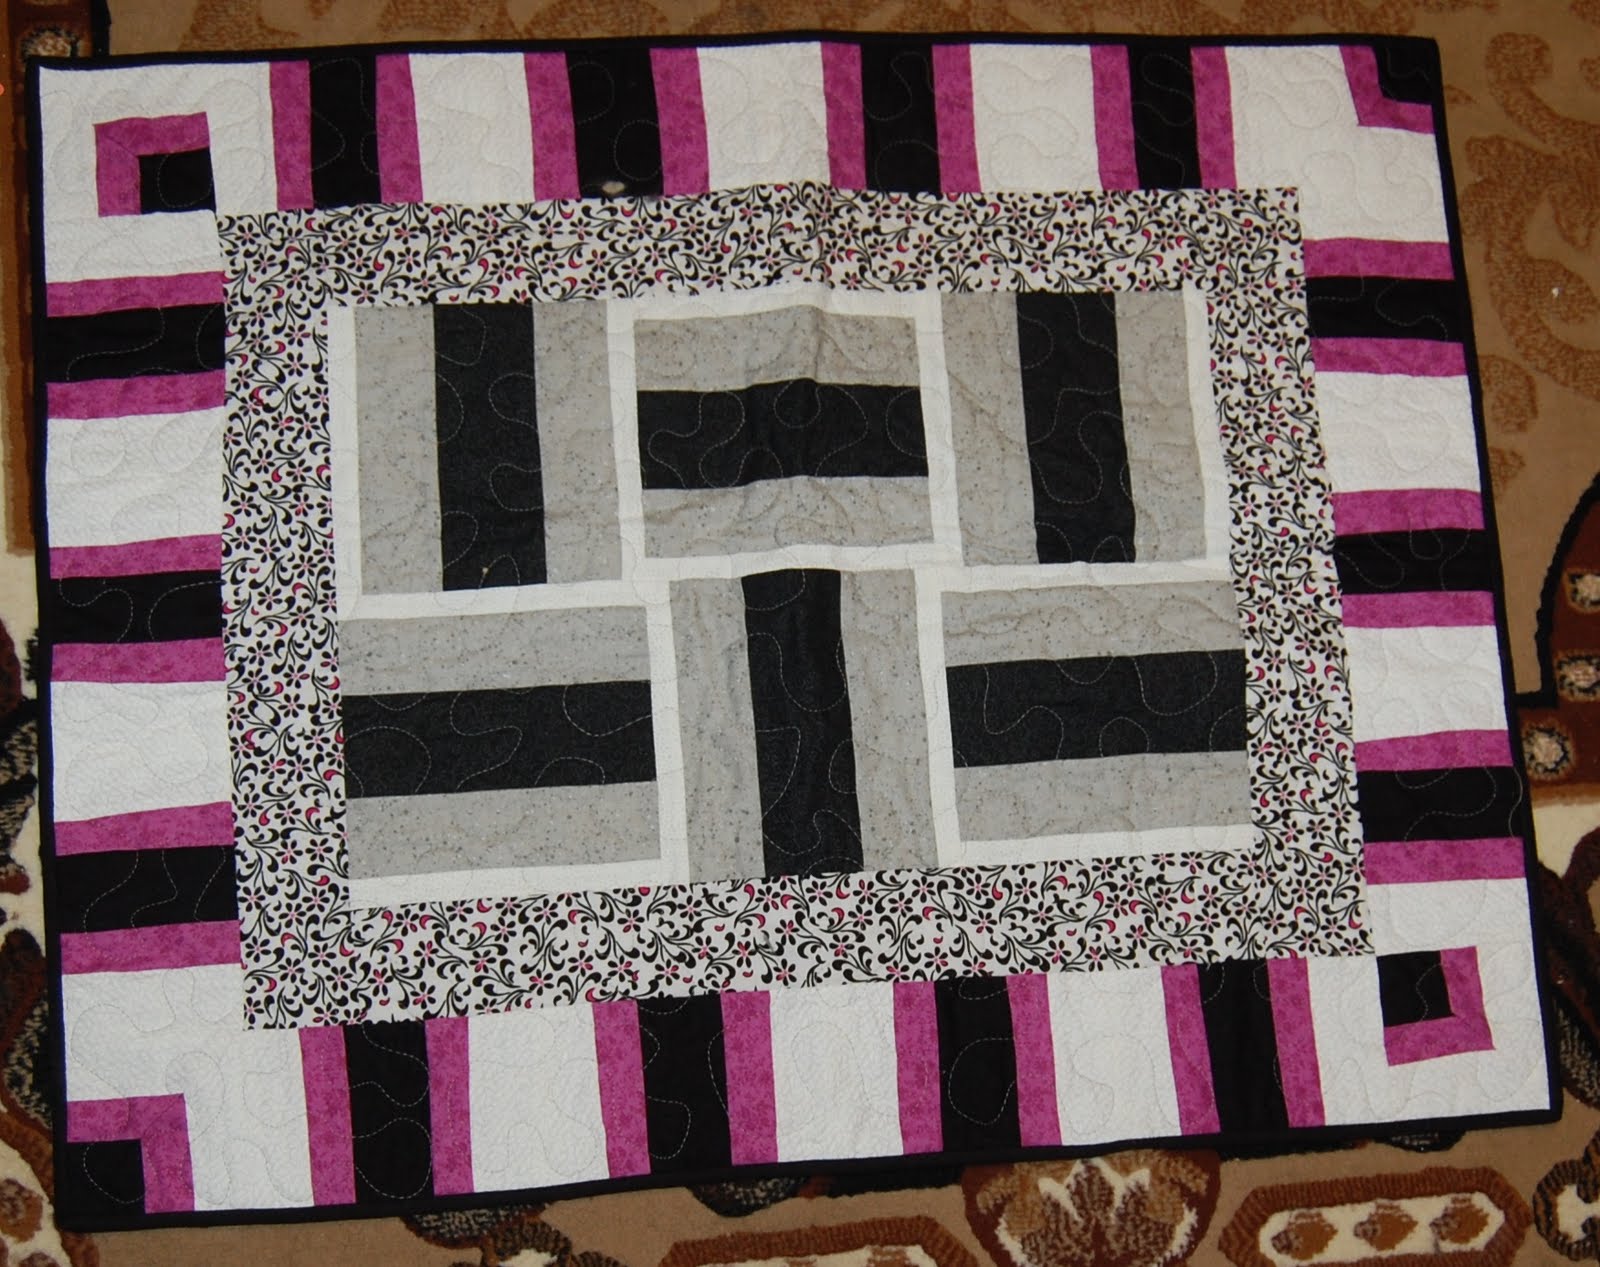
There are two things going on here.  My friend made the same quilt that I mention above (with the strip sets) but in different colors.  It was actually a class I taught in my quilt group.  Her strip sets were white-pink-black-pink-white.  These are here scraps.  Also, I liked the strip set idea so much, that I made another quilt for a friends and used grays and blacks for a strip set.  The pieces in the center are left over from that.  The small print white fabric with black and pink was a piece from my stash and matched all perfectly!  The binding is black left over from another project altogether.


Piece Five – boxes

I made a large quilt where I cut 2 ½ squares and framed them with 1 ½ inch pieces.  The fabric in the center of one row was then used as the outer in the next row.  Here’s a picture of the finished quilt: 


I made five or six runners and toppers from the leftover pieces – including at least two fabrics that I decided not to use in the finished product, but had cut up already.  The binding is from my stash.


Practice Makes Perfect!

Piece Six – black, white, which one?

My challenge piece for my quilt group this year, which I discussed in my last post, was this quilt:


I was only allowed black, white, pink and purple for the challenge.  I knew that either black or white was going to be the background, but just couldn’t picture it in my mind.  I decided to make the center part of the quilt with each background and then decided.  Obviously, I went with the black (you’ve seen the finished quilt twice now).  However, while I wasn’t enamored of the white background, I thought I did a fine job with the piece, so I finished off the center, and quilted it.  It’s a nice sized table topper or wall hanging.


Piece Seven – New Challenge

I’ve talked about Ranae Merrill’s spiral quilts in the blog before.  I’ve also mentioned that I’m doing a new challenge.  This is another one where I get a few colors – black, white, black and white, and dark green.  I’m not going to show the pattern I’ve designed with Ranae’s spiral templates yet, but I did decide to do some testing and figured that I’d make the test piece pretty colorful.  This is the eight pieces (four squares made of two triangles each) that will make up the center of my challenge.


 And here's a close up of one section


Sunday, July 10, 2011

Out of My Comfort Zone

What is Quilting to Me?
When I talk about quilting to most Americans, I preface the conversation with “I am a fabric artist” or something similar.  Why do I do this?  Because the word “quilting” brings up prairie dresses, polyester fabrics (60s-70s), lumpy quilts tied with yarn, and other cheesy elements of “crafting”.  People raised here in the states seem to have a negative image of handmade and handcrafted items.  Sure, there’s a small percentage that make money on the art, and things like Amish quilts are sought after and valued – monetarily as well.  However, my art (fabric) rates below painting, wood crafting and even jewelry making. 

I tried to sell quilts at craft shows a couple times.  I had some small pieces (crib sized) that were six inch squares, some embroidered, and they were quilted and bound – quality pieces.  The fabric was all 100% cotton, the batting was “warm and white” cotton batting and I use good thread.  If I were to buy all the materials retail, I estimated $40-50.  I priced the quilts at $60-80, depending upon how much embroidery and other touches.  Basically, my labor was at a couple dollars an hour.  These were fun pieces that I’d made and I was more interested in testing the market and building a following than anything else.

People looked at them and acted shocked at the price.  One woman even told me that she could get a whole crib set at Wal-mart for $40!  That’s what my hand work was compared to – sweat shop labor created goods at a big box store.  Never again.

Recently, I discovered that one of my Indian friends from work was reading this blog!  I didn’t expect a non-American male to have any interest.  He referred to my pieces pictured here as “thread work” and some other more art terms.  This was fascinating to me; this gave me an ability to take a step back and even look at my own work with a different eye.  I’m jaded from the “cheesy homemade look” perception of quilting and I needed that fresh perspective to get out of the rut.

So to answer my question – quilting to me is an exercise to try and get the creativity I feel inside me out to the world in a visual form.  I have a style, but I don’t have a style.  I remember art class in High School.  I went to a private school, so we actually had art classes that taught techniques.  We were constantly given new ways to do things, and strict rules on colors, shapes, etc., to force us to work outside our paradigm.  The lessons held well with me. 

Challenges
I love quilt challenges…. I seek them out.  They are the best way to work outside my box and do something I would not normally do.  I’ve done four (five if you count scrap tamers) and am currently working on a fifth/sixth. 

Number 1:  This was a fat quarter challenge* from my quilt group.  The theme of the challenge was “reach for the stars” so I made a double/queen sized quilt that is all stars.  It is an original pattern.  The fabric given was a gold and black fabric.  (see closeup)

* In a fat quarter challenge, you are given a fat quarter and you can do ANYTHING with it – any size piece, quilt or other item, and use any other fabrics.


Number 2:  This was another fat quarter challenge from my group.  This time I made a purse.  This was another original pattern.  The challenge fabric is the black fabric with all the little pieces/jewels/etc., on it.  I also made a wristlet and a key fob to out of my scraps!


Number 3:  This is the debated one, and the only one I don’t have a picture of.  I gave it to my father, so I just need to go over there and take one someday….  This wasn’t so much a challenge, but a mystery quilt.  Each month, we were given a block or several smaller blocks to make and in the end put them all together, along with some sashing and bordering, to make a lap sized quilt.  I actually added another row all the way around and made mine up to a small double bed sized.  The challenge part of it for me was that I used fall colors – a palate of brown, orange, rust, etc. – that really aren’t my colors at all.  I was pleasantly surprised at how nice it turned out.  It matched nothing in my house, but my father has orange as a primary color in his living room so I figured it would be a great couch quilt for him.

Number 4:  This was yet another fat quarter challenge from my group.  I made a twin sized quilt.  The challenge fabric is the black/red/grey wavy fabric in the center of some of the squares.


 Number 5:  Another challenge from my group, but NOT a fat quarter challenge.  We were given two color crayons, and could use fabrics matching those and black and/or white fabric.  I was rather disappointed in the challenge overall because I feel that strictness of guidelines was not adhered to.  Me, I took it quite seriously!  My color crayons were pink and purple – two colors I would NOT put together much, especially with only each other and black and white.  I also used both black and white fabric.  I quilted with black and white threads (in different spots) and used white batting, instead of the natural color I usually use!  The pink is pretty visible in the pictures, but the purple is sort of hard to see.  Trust me, it works well.  This is not an original pattern. 


Number 6:  I signed up for and bought the challenge pack from the Minnesota Quilter’s guild.  I’m scared.  This one looks harder.  There are two fabrics, both black and white fabrics, in different amounts.  You have to use “recognizable amounts” of each in the quilt top.  You can also use black, white, black and white and one color fabrics.  The color I got, which is represented by a fabric marker in the pack, is a darker green.  AND – here’s the rub – you have to use that fabric marker to embellish the quilt.  Ok, that’s the part that has me quaking… I don’t do free hand anything!

I’ve started working on an original pattern and I’m doing a test of it with different colors.  I’ve got the center piece done, and it’s going well.  I think I need to reduce the scale however – the quilt may turn out too big to work with for a challenge.  I’ll post later about it.

Other Current Challenge to Myself

Last in today’s diatribe is a self challenge that I’m doing.  My guidelines to myself are to 1. Use a fabric I bought at Nancy’s Notion’s show in a predominant manner and 2. Buy nothing (2a is use up smaller pieces in my stash that I won’t use for anything else.

First – the main fabric.  This is a batik that I bought at the show.  I don’t normally care for batiks much.  I don’t find them as fascinating at some do, and I think that they are generally too expensive to do much with.  I also tend to make quilts with lots of little pieces.  Batiks are pricier and much of it seems to be lost when you chop them up small.  However, when I was perusing the fabrics at the show, this gorgeous piece of fabric just called out to me… it also was 108” wide… and almost $20 a yard… *sigh*.  I bought a big chunk of it and then brought it home, stared at it, and said “what now?”.

I dug into my stash and pulled out all those fat quarters, skinny fats, half yards and a yard piece or two of fabrics that I’ve wound up with from gifts, sale lots, etc., that seemed to be complimentary to the focus fabric.

Here’s where I am so far: (sorry, the pictures are awful - taken with my ipad, on the living room floor, late at night)


The blocks are 14 ½ inches (14 inches finished).  I’m also making a bunch of smaller blocks – same design – where four of them will square up to a block the same size (14 inches).  I’ll them randomly put them all together into a quilt that will be 84 x 112 inches.  I’ll post pictures when I get it done.

Checklist:
·         Focus fabric very visible?  Yes, 6 inch blocks and 2 ½ inch strips allow it to be seen
·         Lots of purple?  Yes
·         Scrappy look?  Yes
·         Not a cheesy home made look?  Yes
·         Outside my normal paradigm?  Yes (all batiks)
·         New and unique design for me?  Sort of – all batiks is new, but the block design is not.
·         Stash reduction goal achieved?  Yes, used up several smaller pieces in stash

Sunday, July 3, 2011

The Haunted Machine

Some definitions/background: 

It seems to me that just like computers users – there are some big buckets that sewing machine users can fall into.  For the purposes of this post, I am going to define two:
·         Automation:  These are users who buy a machine with many, many, stitches and functions.  They push buttons to do what is needed, including adjusting tension, setting a stitch, etc.
·         Mechanical:  These are users who adjust everything on their machine by turning screws, moving knobs, etc. 

Me and Wearing Out Machines

I fall into the mechanical definition.  While I have two very nice and fancy Viking machines that do beautiful work, I much prefer a machine that requires manual adjustments.  I am a power producer with embroidery and quilting and wear out expensive machines.

1.       The Viking Rose:  my first embroidery machine.  I power used this and it started to have tension issues after about 9 months.  This was within the Viking trade in period and the Rose was a 4 x 4 (small) embroidery field.  In those 9 months, I had moved from novice to advanced intermediate in embroidery and wanted MORE… so I traded to the Platinum with the large embroidery field.
2.       The Viking Platinum:  after 15 or so months, I had outgrown the large domestic embroidery field and wanted MORE.  Additionally, the machine was starting to really have tension issues and other things.  When I took it in for services, I was informed that the stitch count on it exceeded machines that had been in service for ten or more years… oooppps…
3.       The Viking Quilt Designer II.  Wonderful machine, larger throat, and I still use it.  However, after about 2 hours of continuous use in stippling a quilt, it WILL blow a fuse.  It is not meant to be used solid for hours.  I can piece on it all day, but stippling… no.

My husband is a car person and we are both also tool people.  He has a TV repair degree, is a good plumber, and has no problems working with gas pipes in the house.  I used to work with computer hardware and I am a darned good electrician.  One thing that we have full understanding about together is to buy the appropriate tool for the job.

So, when I was looking at trading in my Platinum on a better Viking, to the tune of $2500 plus, and with no guarantee that I could make that last longer than two years at my rate of consumption, we investigated commercial machines.  End result – I have a 12 needle, single head Inbro embroidery machine.

Shortly after than replacement (about 2 years actually), I had mastered the machine and learned to stipple in all the time freed up by not switching embroidery colors as often.  That is when I started blowing fuses on the Viking QDII.  I figured out pretty quickly that I would have to replace / supplement that machine with more commercial equipment as well. 

Sharon and the Haunted Juki

One of my friends from my quilt group bought a Juki 1-2 years prior to me starting to look into commercial sewing machines.  Actually, she and her daughter each bought one.  They bought the same machine, but boy oh boy, they did not act the same.

The one that Sharon got – which she used on a quilting frame – had a tension problem.  In the 1.5 – 2 years that she had the machine, she took it to three or four repair people and it never acted right.  It would lose bottom tension and create big loops on the backside of quilts.  She would not notice until she rolled to the next section on the frame and then have to spend hours unstitching.  The other machine, the one that was her daughter’s, and identical in every way, did NOT act up like that.

One day, rather than lobbing the machine through her picture window, she dumped graciously donated it to me.  She knew that I was a very hands on technician of sewing equipment and figured that she was at least saving herself garbage fees and at most, giving me a new toy to experiment with.  

Success!

I have been using the machine for over two years now and while it cannot fully be called a dream, it certainly is not the nightmare it was for her.  It gives me issues, I curse at it sometimes, but I have produced beautiful work on it.  It is far more mechanical than my Vikings and operates at 1500 stitches a minute.  I can run it for hours at a time and it does not blow fuses.  I have had to unstitch, but I have also learned how to feel if the bobbin is correct or not.  About one in every ten bobbin loads, I have to take it out and snap it back in just right.  It only likes certain threads, and depending upon the weight of the thread, I sometimes put the bobbin into the casing opposite how the manual calls for.  That’s a trick that I learned from my commercial embroidery machine – another way to affect tension.

One of my award winning quilts was quilted on that machine.  Here is a picture:


And here is a picture of a close up of the quilting on it done with the Juki:


The stitching is much smaller than I can do on the domestic machines (works faster and I do not have much patience) and turns out very even.  After having the machine for 6/8 months, I took a class at a local quilt shop – Bear Patch Quilting (shout out to them – great shop!) and learned fancy stipples.

This one is a "snail trail"


This one is harder to see, bad example as it blends into the fabric - it is a flower pattern


The Table

I am not using the Juki with a quilt frame and there is not a table made for it.  Not a worry – remember, I told you, we are tool people here!  I got a 2 x 2 sheet of .25 inch plywood, cut out an area matching the bed/throat of the Juki, cut up a dowel for legs, covered it in sticky backed Teflon and we are good to go.  Another shout out here – AxMan surplus in Saint Paul, MN – fantastic place to find odd things; like sticky back wide sheets of Teflon for pennies on the dollar versus a machine shop.

Now Problems….

Unfortunately, now the poor machine does really seem to be in the need for service.  It started slowing down on me today.  I turned it off and left it for hours.  I figured that it was overheating due to excessive use today and also the weather is pretty warm.  However, when I tried again, it also slowed down within minutes and the hand wheel is not turning well.  I do not know if it has belts, or if I should be concerned about the motor.  Of course, this is all happening on Saturday evening, before Monday, July 4th, so it will be a few days before I can take it anywhere.  I will be going through withdrawal folks!

I also worry that if it is something serious, it will be too expensive to consider doing.  It is a $900-1100 dollar machine.  It has problems to begin with.  Do I really want to put $200 plus into a flawed machine?  I love the grumpy piece of metal, but I am also a realist.